Seared ahi tuna is one of those dishes that feels fancy enough for a dinner party but comes together in under 10 minutes, making it perfect for busy weeknights or impressing guests without breaking a sweat.
This recipe uses a simple sear-and-serve approach with high-quality tuna steaks, a light seasoning, and a screaming hot pan to create a gorgeous crust while keeping the center buttery and raw, exactly as it should be.
If you’ve ever ordered ahi tuna at a restaurant and wondered if you could recreate it at home, the answer is absolutely yes—and honestly, your version will probably taste better because you control every variable.
Why You’ll Love This Recipe
This dish delivers restaurant-quality results in your own kitchen with minimal fuss and maximum flavor. The combination of a perfect crust and a tender, melt-in-your-mouth center makes every bite feel indulgent.
- Ready in under 10 minutes from pan to plate
- Requires just five basic ingredients plus seasoning
- Naturally gluten-free, low-carb, and keto-friendly
- Impresses dinner guests while staying stress-free to prepare
- Works as an elegant appetizer, main course, or sushi bowl topper
My Experience Making This Recipe
The first time I made seared ahi tuna at home, I was genuinely nervous about overcooking it or getting the sear wrong. I grabbed the best tuna I could find from my local fish counter, heated my pan until it was almost smoking, and just went for it.
The moment that tuna hit the hot surface and immediately developed a golden crust while the interior stayed perfectly rare, I realized this was going to become a regular rotation in my kitchen. My partner took one bite and asked why we’d been paying restaurant prices for something so simple.
Now I make it at least twice a month, sometimes with a soy-ginger glaze, sometimes with just salt and pepper, and it never disappoints. The key is respecting the fish, using good technique, and not overthinking it.
Recipe Overview
- Recipe Name: Seared Ahi Tuna
- Servings: 2
- Prep Time: 5 minutes
- Cook Time: 3 minutes
- Total Time: 8 minutes
- Course: Main Course
- Cuisine: Japanese-Inspired, Seafood
- Calories per Serving: 240
Equipment You Will Need
- Cast iron skillet or stainless steel skillet (cast iron holds heat best)
- Paper towels
- Instant-read meat thermometer (optional but recommended)
- Small bowl for mixing seasonings
- Tongs or a thin spatula
- Cutting board
- Sharp knife for slicing
Ingredients for Seared Ahi Tuna
- 2 ahi tuna steaks, 5 to 6 ounces each and 1.5 inches thick
- 2 tablespoons high-heat oil (avocado oil or vegetable oil work best)
- 1 teaspoon sea salt
- 1/2 teaspoon black pepper
- 1/2 teaspoon sesame seeds (white or black, optional but adds nice visual appeal)
Optional Glaze Component
- 2 tablespoons soy sauce
- 1 tablespoon mirin or honey
- 1 teaspoon fresh ginger, minced
- 1 clove garlic, minced
Ingredient Notes and Substitutions
- Ahi Tuna Steaks: Sushi-grade ahi tuna is essential here because you’re eating it nearly raw. Never use regular grocery store tuna for this recipe. If you can’t find ahi, yellowfin tuna or bigeye tuna work as solid substitutes and have similar fat content and texture.
- High-Heat Oil: You need an oil with a smoke point above 400 degrees Fahrenheit to sear properly without burning. Avocado oil is my top choice because it stays neutral in flavor. Coconut oil is not suitable here because its lower smoke point and coconut flavor clash with the tuna.
- Sea Salt: Kosher salt works fine if that’s what you have on hand, just use slightly less because kosher salt crystals are larger and contain more air. Table salt has a metallic bite that doesn’t do this dish any favors.
- Sesame Seeds: These add texture and an earthy nuttiness that complements the clean fish flavor. If you skip them, the dish is still excellent, but they’re worth tracking down from any grocery store.
How to Make Seared Ahi Tuna
Step 1: Select and Inspect Your Tuna
Visit a fish counter with a good reputation and ask specifically for sushi-grade or sashimi-grade ahi tuna steaks that are at least 1.5 inches thick. The fish should smell like the ocean, not fishy or ammonia-like, and the color should be a deep, vibrant red with no brown spots or discoloration.
Step 2: Prepare the Tuna for Cooking
Remove the tuna from the refrigerator 5 to 10 minutes before cooking so it reaches room temperature, which ensures even cooking and better texture. Pat each steak completely dry with paper towels, pressing gently but firmly to remove surface moisture, because water prevents proper searing and creates steam instead of a crust.
Step 3: Season Your Tuna
Season both sides of each steak generously with sea salt and black pepper, using about half a teaspoon of salt and a quarter teaspoon of pepper per side. Don’t be shy here; the seasoning should be visible on the surface because it forms part of the crust and balances the richness of the raw center.
Step 4: Heat Your Pan Until It’s Smoking Hot
Place your cast iron or stainless steel skillet over high heat for 2 to 3 minutes, depending on your stove’s power. The pan is ready when you can hold your hand 6 inches above the surface and feel intense heat within 2 seconds, or when you see wisps of smoke rising from the surface.
Step 5: Add Oil to the Screaming Pan
Pour the oil directly into the center of the hot pan, where it should shimmer and spread immediately, almost smoking. The oil needs to be equally hot as the pan so it creates a proper searing environment the moment the tuna makes contact.
Step 6: Sear the First Side of the Tuna
Gently place one tuna steak into the center of the pan and let it sit completely undisturbed for 60 to 90 seconds without moving it at all. Resist the urge to poke, flip, or fidget with it; the tuna needs this time to develop that golden-brown crust through the Maillard reaction, which is the chemical magic that creates flavor.
Step 7: Flip and Sear the Second Side
Using tongs or a thin spatula, flip the tuna over carefully and sear the second side for another 60 to 90 seconds. Repeat the same patient approach: leave it alone and let the heat do the work, creating an equally beautiful crust on this side while the center stays rare and tender.
Step 8: Sear the Thin Edges if Desired
For added visual appeal and a bit more crust coverage, quickly sear the thin sides of the tuna steak by holding it with tongs and pressing the edges against the hot pan for about 15 seconds per side. This step is entirely optional but gives the dish that polished restaurant look.
Step 9: Rest and Slice
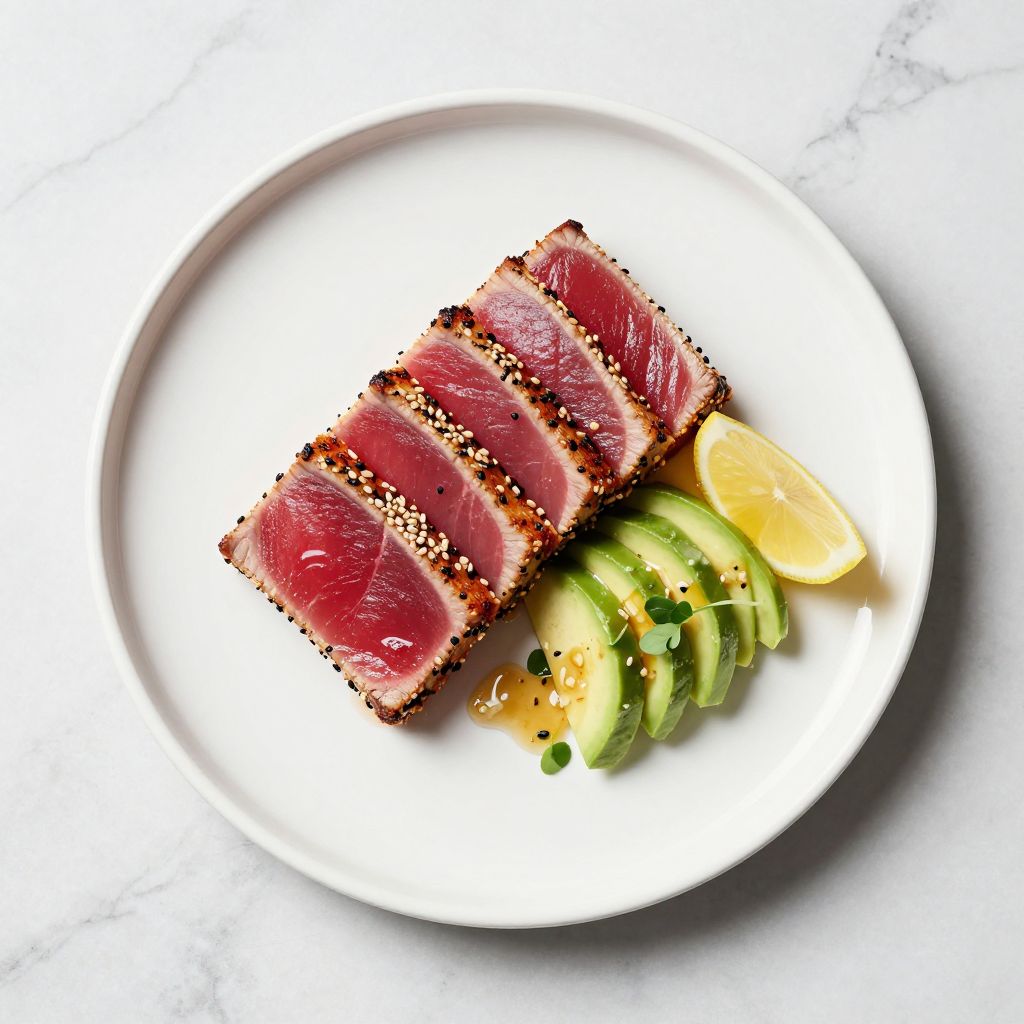
Transfer the seared tuna to a cutting board and let it rest for 1 to 2 minutes before slicing, which helps redistribute the juices and keeps the meat tender. Slice against the grain into quarter-inch thick pieces, which makes for prettier plating and better mouthfeel when you eat it.
Pro Tip: The difference between perfectly seared tuna and overcooked tuna is about 30 seconds, so use an instant-read thermometer if you’re nervous: aim for 110 to 115 degrees Fahrenheit in the center for rare, which will climb a few degrees during resting.
Tips for the Best Seared Ahi Tuna
- Buy your tuna the same day you plan to cook it, or at most the next morning, and keep it on ice in your coldest refrigerator shelf to maintain freshness and food safety.
- Don’t skip the drying step with paper towels; moisture is the enemy of a good sear, and even a thin film of water will turn to steam and ruin your crust.
- If your pan isn’t hot enough, the tuna will cook through before developing a crust, so resist the urge to start cooking if you don’t see smoke or heat shimmer.
- Serve seared ahi tuna immediately after slicing because it cools quickly, and cold tuna loses some of its buttery texture and appeal.
- Invest in a good instant-read thermometer if you make this often; it takes the guesswork out of doneness and builds your confidence in the kitchen.
- Consider sourcing your tuna from a reputable fish market rather than a supermarket, where turnover is faster and quality is consistently higher.
Common Mistakes to Avoid
- Using non-sushi-grade tuna or tuna that’s been sitting in a case for days. Old fish develops bacteria and poses real health risks when eaten raw, so never gamble on quality or freshness.
- Cooking tuna directly from the refrigerator without letting it come to room temperature. Cold fish cooks unevenly and often ends up overcooked on the outside before the center reaches the right temperature.
- Moving or flipping the tuna too early or too often. Every time you flip or fidget with it, you interrupt the searing process and prevent a proper crust from forming.
- Using an oil with a low smoke point like olive oil or coconut oil. These oils burn at high heat and create acrid, unpleasant flavors that overwhelm the delicate fish.
- Letting the seared tuna sit too long before slicing and serving. Seared tuna tastes best served warm within a few minutes of cooking, before it cools down and loses its appeal.
Serving Suggestions
Seared ahi tuna works beautifully as a standalone main course with fresh lemon, or you can build a complete plate by adding complementary sides that enhance rather than overshadow the star ingredient. The key is keeping flavors clean and bright so the tuna remains the highlight.
- Serve over a bed of mixed greens with avocado, cucumber, and a light ponzu dressing for a fresh, elegant salad
- Pair with steamed jasmine rice and roasted bok choy for a simple, restaurant-quality dinner plate
- Layer seared tuna on top of a sushi bowl with sushi rice, edamame, pickled ginger, and nori strips
- Plate with roasted asparagus and a drizzle of sesame oil mixed with soy sauce for an umami-forward side pairing
- Serve alongside miso soup and a crisp white wine like Sauvignon Blanc or a light Japanese beer like Asahi
Variations to Try
- Soy-Ginger Glaze: Mix 2 tablespoons soy sauce with 1 tablespoon mirin and 1 teaspoon minced fresh ginger, then brush this mixture on the tuna after searing for deeper umami flavor and a subtle Asian-inspired edge.
- Wasabi Crust: Mix 1 tablespoon wasabi paste with 1 tablespoon panko breadcrumbs and apply this mixture to the tuna before searing for a spicy kick and extra textural contrast.
- Sesame-Crusted Version: Roll the seasoned tuna steaks in a mixture of black and white sesame seeds before searing to create a nutty, crunchy exterior that’s visually striking.
- Citrus-Marinated Ahi: Marinate the tuna in lime juice, olive oil, and fresh cilantro for 15 minutes before searing for a lighter, more refreshing flavor profile that works beautifully in the summer.
- Spicy Sriracha Version: Mix sriracha with mayo and spread a thin layer on each side of the tuna before searing for heat and richness that complements the clean fish flavor.
Dietary Adaptations
- Gluten-Free: This recipe is naturally gluten-free as written, so no adjustments needed unless you’re using a glaze that contains soy sauce; swap regular soy sauce for tamari, which is gluten-free.
- Dairy-Free: The base recipe contains no dairy whatsoever, making it perfect for anyone avoiding milk products or following a dairy-free lifestyle.
- Vegan/Vegetarian: Seared ahi tuna is not suitable for vegan or vegetarian diets because the entire dish centers on fish; consider searing thick slices of watermelon or tofu instead for a similar seared-crust effect.
- Low-Carb/Keto: Seared ahi tuna is an excellent keto choice with minimal carbohydrates and high-quality protein; pair it with cauliflower rice or zucchini noodles instead of regular rice for a keto-compliant meal.
Storage and Reheating
Refrigerator
Store leftover seared tuna in an airtight container on the coldest shelf of your refrigerator for up to 2 days maximum. Because this dish is meant to be eaten rare, refrigeration continues to cook the center slightly, which can compromise texture and safety.
- Eat cold straight from the container as sushi-style bites
- Add to a poke bowl with soy sauce, sesame oil, and rice
- Layer into a salad with greens and avocado for lunch
Freezer
Raw seared ahi tuna does not freeze well because the delicate texture becomes mushy when thawed. If you have leftovers you want to save, freeze them only as a last resort, understanding that the quality will suffer significantly.
- Freeze in a freezer bag for up to 1 month
- Use only for poke bowls or sushi rolls where texture is less critical
Reheating
Reheating seared tuna at high heat will overcook the center and dry it out, so avoid microwaving or pan-heating leftovers. The best approach is eating it cold or at room temperature within 2 days of cooking.
- Bring to room temperature for 15 minutes before serving for best flavor
- Never reheat in the microwave or oven, which will overcook the tender interior
Nutrition Information
| Nutrient | Amount |
|---|---|
| Calories | 240 |
| Total Fat | 12 grams |
| Saturated Fat | 2.5 grams |
| Carbohydrates | 0 grams |
| Fiber | 0 grams |
| Sugar | 0 grams |
| Protein | 32 grams |
| Sodium | 580 milligrams |
| Cholesterol | 65 milligrams |
These values are calculated for a single 5-ounce seared ahi tuna steak with the seasoning and cooking oil included. Nutrition may vary slightly depending on your specific tuna source and exact portion size.
Frequently Asked Questions
Can I cook seared ahi tuna well-done instead of rare?
You can, but it defeats the purpose of eating ahi tuna, which is prized specifically for its buttery, tender rare center. Cooking it to medium or well-done makes the fish dry and tough, and you might as well use a cheaper fish at that point.
How do I know if my tuna is sushi-grade and safe to eat raw?
Ask your fishmonger directly whether the tuna is sushi-grade or sashimi-grade, and only buy from reputable fish markets where turnover is fast. Reputable sources source their fish from verified suppliers and handle it properly, which ensures it’s been flash-frozen to eliminate parasites.
Can I prepare and season the tuna ahead of time, or must I cook it right before serving?
You can season the tuna up to 30 minutes ahead and store it in the refrigerator, but you must sear it immediately before serving for the best results. Seared ahi tuna tastes noticeably better when served warm, so plan your timing accordingly.
What’s the difference between ahi tuna, yellowfin tuna, and bigeye tuna, and can I use them interchangeably?
Ahi tuna is actually yellowfin tuna; the two names are used interchangeably in the market, and both work beautifully for this recipe. Bigeye tuna has slightly darker, richer meat and a higher fat content, making it equally suitable if that’s what your fishmonger has available.
Is it safe to eat seared ahi tuna that’s mostly raw in the center?
Seared Ahi Tuna
Ingredients
Equipment
Method
- Remove tuna from the refrigerator 5–10 minutes before cooking and pat completely dry with paper towels.
- Season both sides of each steak with sea salt and black pepper; sprinkle sesame seeds on the surface if using.
- Place a cast-iron or stainless steel skillet over high heat for 2–3 minutes until very hot and just beginning to smoke.
- Add the high-heat oil; it should shimmer immediately.
- Lay the first tuna steak in the center of the pan and sear, undisturbed, for 60–90 seconds until a golden crust forms.
- Flip carefully with tongs and sear the second side for another 60–90 seconds, keeping the center rare (110–115°F if checking temperature).
- Optional: Hold the tuna with tongs and sear the thin edges for about 15 seconds per edge for additional crust.
- Transfer tuna to a cutting board and let rest 1–2 minutes.
- Slice against the grain into 1/4-inch thick pieces and serve immediately.
- If using the soy-ginger glaze, whisk glaze ingredients in a small bowl and drizzle over sliced tuna just before serving.