Brazilian cheese bread, or pao de queijo, is a chewy, savory treat that’ll have you wondering why you didn’t discover it sooner. Made with tapioca starch, cheese, and a handful of pantry staples, this recipe delivers restaurant-quality results in under 30 minutes.
These golden, airy puffs are naturally gluten-free, wildly addictive, and perfect for breakfast, snacks, or alongside dinner. Read on to master the technique and bring authentic Brazilian flavors to your kitchen.
Why You’ll Love This Recipe
Pao de queijo checks every box for a home baker seeking something quick, impressive, and genuinely craveable.
- Ready in under 30 minutes from start to serving
- Naturally gluten-free thanks to tapioca starch as the base
- Requires just seven simple ingredients, most already in your pantry
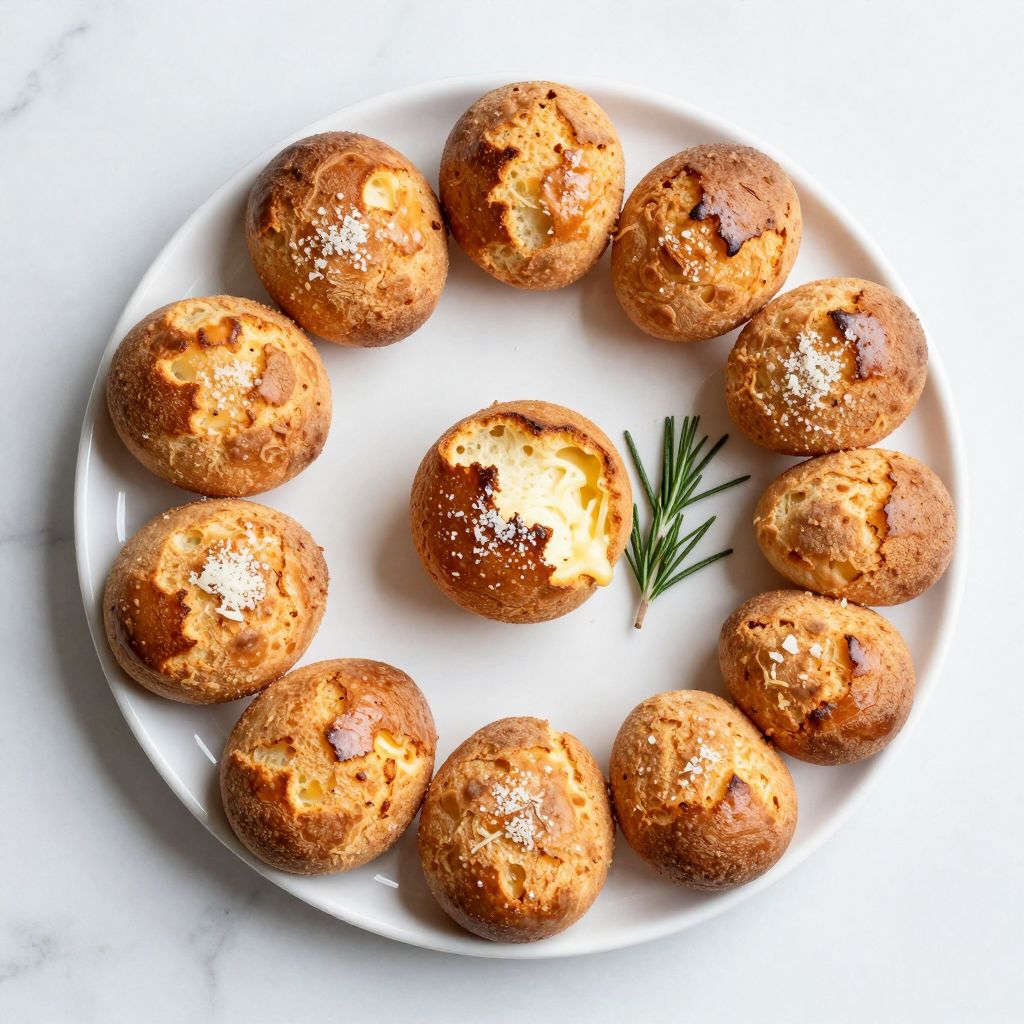
- Produces a tender crumb with crispy golden exterior
- Reheats beautifully and stays fresh for days
My Experience Making This Recipe
The first time I made pao de queijo, I was skeptical that tapioca starch could produce anything worth eating. The dough felt nothing like traditional bread batter, sticky and almost gummy in my hands.
Then I pulled them from the oven and took that first bite. The contrast was revelatory: a crackling crust giving way to a molten cheese center with a springy, almost marshmallow-like crumb that pulled apart in strands.
My family inhaled the batch in minutes, and now I make them weekly. They’re foolproof once you understand what the dough should feel like, and they’ve become my go-to when I need to impress without spending hours in the kitchen.
Recipe Overview
- Recipe Name: Brazilian Cheese Bread (Pao de Queijo)
- Servings: 16 pieces
- Prep Time: 10 minutes
- Cook Time: 18 minutes
- Total Time: 28 minutes
- Course: Breakfast, Snack, Side
- Cuisine: Brazilian
- Calories per Serving: 145
Equipment You Will Need
- Two muffin tins or silicone muffin molds (for 16 pieces)
- Large mixing bowl
- Wooden spoon or sturdy spatula
- Measuring cups and spoons
- Oven preheated to 400 degrees Fahrenheit
- Small saucepan for melting butter
- Cheese grater (for fresh cheese if not using pre-shredded)
Ingredients for Brazilian Cheese Bread
- Tapioca starch – 1 1/2 cups
- Whole milk – 1 cup
- Butter – 6 tablespoons
- Shredded Parmesan cheese – 1 1/2 cups, packed
- Eggs – 2 large
- Sea salt – 1/2 teaspoon
- Black pepper – 1/4 teaspoon (optional)
Ingredient Notes and Substitutions
- Tapioca starch: This is the backbone of pao de queijo, creating that signature chewy texture and naturally gluten-free base. If unavailable, potato starch will work in a pinch, though the texture will be slightly less airy, and you can swap it one-to-one.
- Whole milk: Whole milk delivers richness and helps create tender crumbs. Half-and-half works beautifully if you want even richer results, using the same amount.
- Parmesan cheese: Aged Parmesan brings the signature salty, nutty flavor that makes pao de queijo addictive. You can substitute with Pecorino Romano for a sharper bite, or a 50/50 blend of Parmesan and Gruyere for deeper complexity.
- Butter: Unsalted butter lets you control the salt level. Salted butter works fine, so reduce the added salt by half.
- Eggs: These bind the dough and help it rise slightly. They cannot be omitted without changing the recipe fundamentally.
How to Make Brazilian Cheese Bread
Step 1: Preheat and Prepare
Heat your oven to 400 degrees Fahrenheit and lightly grease two muffin tins or place silicone muffin molds on a baking sheet. Room temperature equipment helps the dough mix smoothly without temperature shock.
Step 2: Heat the Milk and Butter
Pour the milk into a small saucepan and add the butter, then heat over medium heat until the butter melts and the milk is steaming but not boiling. This warms the tapioca starch and helps it hydrate evenly, creating a smoother dough.
Step 3: Combine Tapioca and Cheese
Pour the tapioca starch into a large mixing bowl and add the shredded Parmesan cheese, salt, and pepper if using. Stir these dry ingredients together with a wooden spoon so the cheese and seasonings distribute evenly.
Step 4: Pour in the Hot Milk Mixture
Carefully pour the hot milk and melted butter into the bowl with the tapioca mixture, stirring continuously until combined. The dough will look shaggy and lumpy at first, which is exactly what you want.
Step 5: Cool Slightly and Add Eggs
Let the dough cool for 2 to 3 minutes so the eggs won’t cook when you add them. Crack both eggs into a small bowl, beat them lightly with a fork, then add them to the dough.
Step 6: Stir Until Smooth
Stir vigorously for 30 to 45 seconds until the dough becomes smooth and glossy with a thick, wet consistency like thick cake batter. The mixture should pull away slightly from the sides of the bowl and hold its shape on a spoon.
Step 7: Fill the Muffin Cups
Spoon the batter into the prepared muffin cups, filling each about three-quarters full. The dough will rise during baking, and you want enough room for that expansion without overflow.
Step 8: Bake Until Golden
Bake for 18 to 22 minutes until the tops are deep golden brown and a toothpick inserted into the center comes out clean or with just a few moist crumbs. The cheese will have melted inside, creating those stretchy, molten pockets you’re after.
Step 9: Cool and Serve
Let the pao de queijo cool in the tin for 3 to 5 minutes, then run a thin knife around the edges to loosen them. Serve warm or at room temperature for the best texture and flavor.
Pro Tip: Don’t skip the cooling step after mixing in the milk and butter. Adding eggs to hot dough can cause them to cook prematurely, resulting in a grainy, dense texture instead of that signature creamy center.
Tips for the Best Brazilian Cheese Bread
- Use freshly grated Parmesan if possible; pre-shredded cheese often contains anti-caking agents that interfere with texture. If you must use bagged cheese, whisk it into the tapioca starch to break up any clumps.
- Don’t overbeat the dough after adding eggs. Mix just until combined; overworking can develop gluten-like structure that toughens the final result.
- Fill muffin cups evenly so all pieces bake at the same rate. If some cups are fuller than others, the bread will bake unevenly.
- Bake immediately after filling; letting the batter sit allows tapioca to absorb too much moisture and makes the bread denser.
- For extra cheesy flavor, sprinkle a small pinch of Parmesan on top of each piece before baking. This creates an extra-crispy, flavorful crust.
- Check for doneness by color and toothpick test rather than time alone, as ovens vary. The tops should be clearly golden, not pale or pale golden.
Common Mistakes to Avoid
- Using potato starch or cornstarch as a direct swap: These create a denser, grainier texture because they hydrate differently than tapioca. Tapioca starch is essential for that signature chewy crumb.
- Skipping the cooling step: Adding eggs to boiling dough scrambles them and ruins the smooth, creamy interior texture.
- Overbaking: Even 2 minutes too long dries out the interior and creates a tough, rubbery bite instead of that tender, stretchy center.
- Using low-fat milk: This produces lean, dry results because the fat contributes to richness and moisture retention during baking.
- Underfilling the cups: Pao de queijo needs enough dough to create steam and lift, so cups that are less than half full produce flat, dense pieces.
Serving Suggestions
Pao de queijo shines at breakfast, paired with strong coffee or hot chocolate, and also works beautifully as an afternoon snack or dinner side. Serve them warm for maximum enjoyment, as the cheese is most stretchy and melted.
- With a cup of rich Brazilian hot chocolate or strong black coffee
- Alongside scrambled eggs and fresh fruit for a complete breakfast
- With a light green salad and grilled chicken for a protein-packed lunch
- As a side to feijoada, Brazil’s iconic black bean stew
- On a charcuterie board with cured meats, pickles, and fresh fruit
Variations to Try
- Bacon and Cheddar Pao de Queijo: Replace half the Parmesan with sharp cheddar and fold in 4 ounces of crispy bacon bits before baking. The bacon adds smokiness and crunch that pairs beautifully with the cheesy center.
- Jalapeño Popper Style: Add 1/2 cup of finely diced jalapeños and 1/4 cup cream cheese mixed into the dough. This creates a spicy kick and creamy pockets throughout.
- Herb Garden Version: Mix in 2 tablespoons of fresh chopped herbs such as rosemary, thyme, or basil along with the cheese. Fresh herbs brighten the flavor without overpowering the cheese.
- Garlic Parmesan Upgrade: Infuse the milk with 3 minced garlic cloves before heating, then strain them out. Add 1 tablespoon fresh lemon zest to the dry ingredients for a brighter flavor profile.
- Smoked Cheese Version: Use smoked Gouda or smoked cheddar in place of half the Parmesan. Smoking adds depth and complexity that transforms the flavor without changing the technique.
Dietary Adaptations
- Gluten-free: This recipe is already naturally gluten-free. Simply ensure your tapioca starch comes from a certified gluten-free source if you’re serving someone with celiac disease.
- Dairy-free: Substitute the milk with unsweetened almond or oat milk and use dairy-free butter; replace Parmesan with nutritional yeast mixed with salt. The result will be less rich, but still flavorful and satisfying.
- Vegan: Use plant-based milk, vegan butter, and replace eggs with a flax egg (1 tablespoon ground flaxseed mixed with 2.5 tablespoons water per egg). Skip the cheese or use cashew-based parmesan alternative for richness.
- Low-carb or Keto: Tapioca starch is high in carbs, so this recipe doesn’t adapt well to keto. Almond flour creates a different texture entirely and isn’t a viable substitute.
Storage and Reheating
Refrigerator
Store cooled pao de queijo in an airtight container for up to 5 days. They stay fresh and maintain their chewy texture beautifully.
- Keep in an airtight container on the counter for up to 2 days
- Refrigerate for up to 5 days in an airtight container
- Place parchment paper between layers to prevent sticking
Freezer
Freeze baked pao de queijo for up to 3 months in a freezer-safe container or zip-top bag. They thaw and reheat beautifully, tasting nearly as good as freshly baked.
- Cool completely before freezing
- Wrap individually in plastic wrap, then place in a freezer bag to prevent freezer burn
- Label with the date so you know when they were frozen
Reheating
Reheat refrigerated or frozen pao de queijo in a 350-degree oven for 5 to 8 minutes until warmed through and the cheese is melted again. A toaster oven works perfectly for this and saves energy.
- Oven method: 5 to 8 minutes at 350 degrees Fahrenheit for best results
- Microwave method: 20 to 30 seconds per piece, though this produces softer results
- Thaw frozen pieces in the refrigerator overnight before reheating
Nutrition Information
| Nutrient | Amount |
|---|---|
| Calories | 145 |
| Total Fat | 8g |
| Saturated Fat | 5g |
| Carbohydrates | 12g |
| Fiber | 0g |
| Sugar | 0.5g |
| Protein | 6g |
| Sodium | 280mg |
| Cholesterol | 35mg |
These values are approximate and calculated per piece from a batch of 16. Nutritional content varies slightly depending on the exact brands and portion sizes used.
Frequently Asked Questions
Can I use milk powder instead of liquid milk?
Yes, you can mix 1/3 cup milk powder with 1 cup water to replace the liquid milk, though the texture may be slightly less tender. Warm the mixture before combining with the tapioca to ensure even hydration.
What if my dough looks too wet or too thick?
The dough should resemble thick cake batter, holding its shape on a spoon but still spreadable. If it’s too thin, add 2 tablespoons more tapioca starch; if too thick, add 1 tablespoon of milk.
Can I make the dough ahead and bake later?
It’s not recommended to let the dough sit more than 15 minutes before baking, as tapioca absorbs moisture over time and creates denser results. For best results, mix and bake immediately.
Why did my pao de queijo come out flat and dense?
Flat results usually mean underfilled cups, cold dough when baked, or tapioca starch that’s been sitting in the batter too long. Ensure your dough is at room temperature, fill cups adequately, and bake right after mixing.
Can I use a stand mixer instead of mixing by hand?
Yes, use the paddle attachment on low speed, mixing for just 30 seconds after adding eggs to avoid overdeveloping any gluten-like structure. Hand mixing gives you better control and ensures you don’t overbeat.
What’s the difference between pao de queijo and regular bread?
Pao de queijo uses tapioca starch instead of wheat flour, making it gluten-free and naturally chewy. It also has a higher cheese-to-starch ratio, creating a richer, more savory bite than standard bread.
Final Thoughts
Brazilian cheese bread is one of those recipes that feels like a small victory every time you pull a batch from the oven. The technique is straightforward, the ingredients are forgiving, and the results are consistently impressive.
Once you nail this version, you’ll find yourself experimenting with variations and making them constantly. They’re the perfect introduction to Brazilian baking and a reminder that simple ingredients handled well create magic in the kitchen.
Brazilian Cheese Bread (Pao de Queijo)
Ingredients
Equipment
Method
- Preheat the oven to 400°F (200°C) and lightly grease 16 cups of two muffin tins or set silicone molds on a baking sheet.
- Combine the milk and butter in a small saucepan over medium heat; warm until the butter melts and the milk is steaming but not boiling, about 3–4 minutes.
- In a large bowl, stir together the tapioca starch, shredded Parmesan, sea salt, and black pepper.
- Pour the hot milk-butter mixture over the tapioca mixture while stirring continuously; the dough will look shaggy.
- Let the dough cool for 2–3 minutes. Lightly beat the eggs, then add them to the bowl and stir vigorously until the batter becomes smooth, glossy, and thick, about 30 seconds.
- Spoon the batter into the prepared muffin cups, filling each about three-quarters full.
- Bake for 18–22 minutes, or until the tops are deep golden brown and a toothpick inserted in the center comes out clean.
- Cool in the pan for 3–5 minutes, then remove and serve warm.