Bottom Round Roast is a budget-friendly, deeply flavorful cut that transforms into tender, juicy meat when cooked low and slow. This affordable beef delivers rich, beefy flavor perfect for Sunday dinners, family gatherings, or meal prep.
The key to nailing this recipe lies in proper seasoning, a good sear, and patient braising that breaks down the muscle fibers into fork-tender perfection. Let me walk you through my foolproof method that delivers restaurant-quality results every single time.
Why You’ll Love This Recipe
Bottom round roast checks every box for a weeknight or weekend showstopper. You get incredible flavor, minimal hands-on time, and a roast that feeds a crowd without breaking the bank.
- Budget-friendly cut that costs half the price of premium roasts
- Produces fall-apart tender meat when braised low and slow
- Fills your kitchen with an aroma that makes everyone ask what’s cooking
- Creates its own rich gravy for potatoes, bread, or vegetables
- Makes amazing leftovers for sandwiches and sliced beef plates
My Experience Making This Recipe
I discovered the magic of bottom round roast after years of skipping past it at the butcher counter. The first time I slow-cooked one with root vegetables, my skeptical husband came into the kitchen three times asking when dinner would be ready because the smell was driving him crazy.
What amazed me most was how a tough, lean cut could become so tender without any special tricks or expensive ingredients. My kids actually asked for seconds, which never happens with roast beef, and I realized I’d found my go-to dinner formula.
Now I make this roast at least twice a month, and I’ve converted several friends who thought bottom round was only good for ground beef. The confidence you get from nailing an inexpensive cut that tastes like you spent hours fussing over it? That’s the real win here.
Recipe Overview
- Recipe Name: Bottom Round Roast
- Servings: 8 to 10
- Prep Time: 15 minutes
- Cook Time: 3 to 3.5 hours
- Total Time: 3 hours 45 minutes
- Course: Main Dish
- Cuisine: American
- Calories per Serving: 310
Equipment You Will Need
- Large heavy-bottomed Dutch oven or roasting pan with lid
- Instant-read meat thermometer
- Sharp carving knife for slicing
- Cutting board
- Paper towels
- Measuring spoons and cups
- Wooden spoon for stirring
- Tongs for turning the roast
Ingredients for Bottom Round Roast
- One 3 to 3.5 pound bottom round roast
- Kosher salt, 2 teaspoons
- Black pepper, 1 teaspoon
- Garlic powder, 1 teaspoon
- Dried thyme, 1 teaspoon
- Olive oil, 2 tablespoons
- Yellow onions, 2 medium, quartered
- Beef broth, 2 cups
- Red wine (optional), 1 cup
- Carrots, 4 medium, cut into chunks
- Potatoes, 6 medium, quartered
- Fresh rosemary sprigs, 3
- Bay leaves, 2
Ingredient Notes and Substitutions
- Bottom Round Roast: This lean cut benefits from moist heat cooking, which breaks down collagen into gelatin and keeps the meat from drying out. Top round or chuck roast work as excellent substitutes, though cooking times may vary slightly.
- Kosher Salt: Its larger crystals dissolve slowly and distribute seasoning evenly throughout the meat. Table salt works but use about 1.5 teaspoons since it’s finer and saltier by volume.
- Beef Broth: Provides the liquid base for braising and creates the foundation for gravy. Chicken broth or vegetable broth can substitute if beef broth is unavailable, but the final flavor will be milder.
- Red Wine: Adds acidity and depth that complements beef beautifully and helps tenderize the meat. If you skip it, use an extra cup of broth or add one tablespoon of balsamic vinegar to the liquid.
- Fresh Rosemary: Its piney, slightly bitter notes cut through the richness of beef perfectly. Dried rosemary works at one-third the amount, or substitute dried thyme, oregano, or marjoram.
How to Make Bottom Round Roast
Step 1: Prepare Your Roast
Remove your bottom round roast from the refrigerator 30 minutes before cooking so it reaches closer to room temperature throughout. This helps it cook more evenly and prevents the outside from overcooking before the inside is done.
Step 2: Season Generously
Pat the roast dry with paper towels, then combine kosher salt, black pepper, garlic powder, and dried thyme in a small bowl. Rub this mixture all over the roast, getting into crevices and covering every surface for bold, consistent flavor.
Step 3: Sear the Roast
Heat olive oil in your Dutch oven over medium-high heat until shimmering, then place the roast inside and sear for 3 to 4 minutes per side until deeply browned. This browning creates a flavorful crust and develops the rich, savory notes that make this roast taste amazing.
Step 4: Remove and Set Aside
Transfer the seared roast to a plate and set it aside while you build the braising liquid. The meat will finish cooking in the oven, so don’t worry if it’s not fully cooked at this point.
Step 5: Sauté Your Aromatics
Add quartered onions to the same Dutch oven and cook for 2 to 3 minutes, stirring occasionally to incorporate the browned bits stuck to the bottom. These browned bits, called fond, pack incredible flavor and enrich your final gravy.
Step 6: Build the Braising Liquid
Pour in beef broth and red wine if using, stirring to deglaze the pan and release all those flavorful brown bits from the bottom. Add fresh rosemary sprigs and bay leaves for aromatic depth that transforms the braising liquid into restaurant-quality gravy.
Step 7: Return Roast and Braise
Place the seared roast back into the Dutch oven, nestling it into the liquid so it’s partially submerged. Cover with the lid and transfer to a 325-degree Fahrenheit oven for 2 hours.
Step 8: Add Vegetables
After 2 hours, remove the Dutch oven and add your carrots and potatoes, arranging them around the roast. Cover again and return to the oven for another 45 minutes to 1 hour, until the roast reaches an internal temperature of 160 to 165 degrees Fahrenheit for medium doneness.
Step 9: Rest Before Carving
Remove the roast from the oven and let it rest in the braising liquid for 10 minutes before carving. This resting period allows the juices to redistribute throughout the meat, keeping every slice moist and tender.
Step 10: Slice and Serve
Using a sharp carving knife, slice the roast against the grain into half-inch-thick slices for maximum tenderness. Arrange on a platter with vegetables and spoon some of that rich braising liquid over the top.
Pro Tip: Always let your roast rest at room temperature for 30 minutes before cooking and another 10 minutes after cooking, as these pauses in temperature make an enormous difference in final tenderness and juiciness.
Tips for the Best Bottom Round Roast
- Use a meat thermometer inserted into the thickest part without touching bone, checking for 160 to 165 degrees for medium doneness. Overcooking this lean cut results in dry, tough meat that no amount of gravy can fix.
- Don’t skip the searing step, even though it adds a few minutes to prep. This browning builds flavor depth that braising alone cannot achieve.
- Keep the oven temperature at 325 degrees, not higher, since high heat toughens the outside before the inside has time to become tender. Low and slow is your friend here.
- Leave the lid on during braising so steam stays trapped and keeps the meat moist through the cooking process. Only uncover it during the final 15 minutes if you want a bit of browning on the top.
- Make extra braising liquid by using a 3-to-1 ratio of broth to wine, which gives you plenty of rich sauce for serving. You can reduce this liquid on the stovetop after serving to concentrate the flavors even more.
- Choose a roast with some marbling if possible, as these thin lines of fat melt during cooking and keep the meat from drying out. Ask your butcher to show you a few options before buying.
Common Mistakes to Avoid
- Skipping the sear: A roast dropped straight into braising liquid stays pale and tastes one-dimensional. The brown crust is where all the savory magic lives.
- Cooking at too high a temperature: Roasting at 375 degrees or higher toughens the meat and causes the outside to dry out while the inside stays undercooked. Stick to 325 degrees for tender, even results.
- Using too little liquid: Bottom round roast is lean and needs enough braising liquid to stay moist throughout cooking. Aim for liquid that reaches halfway up the sides of the roast.
- Skipping the rest: Cutting into the roast immediately after removing it from the oven causes all those precious juices to run out onto the cutting board. Ten minutes of rest makes a massive difference in how juicy each slice tastes.
- Overcooking past medium doneness: This lean cut becomes tough and dry at medium-well or well-done temperatures. Pull it at 160 to 165 degrees and let carryover cooking raise the temperature slightly during resting.
Serving Suggestions
Bottom round roast shines with simple sides that let the meat and rich gravy take center stage. Think about what soaks up sauce best and pairs with beef beautifully.
- Creamy mashed potatoes or buttered egg noodles for soaking up the braising liquid
- Crusty bread or dinner rolls to wipe clean your plate
- Sautéed green beans with garlic and butter for a light vegetable contrast
- Roasted Brussels sprouts tossed with balsamic vinegar for a slightly sweet, tangy side
- A simple green salad with vinaigrette to cut through the richness of the meat and sauce
Variations to Try
- French-Style Pot Roast: Add pearl onions, mushrooms, and bacon pieces to the braising liquid for a classic coq au vin style preparation that feels fancy but stays simple. The bacon fat adds richness that elevates the whole dish.
- Italian Version: Replace red wine with dry white wine, add sun-dried tomatoes, olives, and Italian herbs like oregano and basil. This version feels lighter and brighter while keeping the same tender, succulent meat.
- Asian-Inspired Roast: Add soy sauce, ginger, garlic, and star anise to the braising liquid along with carrots and onions. Serve with steamed rice and bok choy for a completely different flavor profile.
- Spanish Braised Roast: Use smoked paprika in the rub, add chorizo to the braising liquid, and include red bell peppers and olives. This version tastes warm, smoky, and slightly spicy.
- Coffee and Cocoa Rub: Add one tablespoon of cocoa powder and one teaspoon of instant coffee to your dry rub for a complex, earthy depth. The coffee and chocolate don’t make the roast taste like coffee or chocolate, they simply amplify the savory beef flavors.
Dietary Adaptations
- Gluten-Free: This recipe is naturally gluten-free as written since none of the ingredients contain gluten. Just verify your broth and wine labels if anyone in your household has celiac disease or severe gluten sensitivity.
- Dairy-Free: The base recipe contains no dairy, so it works perfectly for dairy-free diets without any modifications. The buttery, rich flavors come entirely from the meat and braising liquid.
- Low-Carb or Keto: Skip the potatoes and carrots, replacing them with low-carb vegetables like zucchini, cauliflower, and celery for similar texture and bulk. The roast itself fits keto perfectly and provides excellent protein and fat.
- Vegan or Vegetarian: Swap the beef roast for a large portobello mushroom cap or a block of extra-firm tofu, reducing cooking time to 30 to 40 minutes. Use vegetable broth instead of beef broth for the braising liquid.
Storage and Reheating
Refrigerator
Let the roast cool to room temperature, then transfer the meat and vegetables along with the braising liquid to an airtight container. It keeps for up to 4 days in the refrigerator and actually tastes better the next day as flavors meld together.
- Store in a shallow container so the roast cools quickly and safely
- Keep the braising liquid with the meat to maintain moisture
- Transfer to the refrigerator within 2 hours of cooking
Freezer
Cool the roast completely, then slice it and pack it into a freezer-safe container with the braising liquid, removing as much air as possible. It freezes beautifully for up to 3 months without losing quality.
- Freeze in portions so you can thaw only what you need
- Leave a quarter-inch of headspace in containers to allow for expansion
- Label with the date so you know how long it has been frozen
Reheating
Thaw frozen roast overnight in the refrigerator, then gently reheat in a 325-degree oven with the braising liquid for 20 to 30 minutes until warmed through. You can also reheat on the stovetop over medium-low heat in a covered pot, stirring occasionally.
- Never microwave the roast, as this dries out the meat and heats unevenly
- Add a splash of broth if the liquid has reduced too much during storage
- Heat only until the roast reaches 165 degrees internally to avoid overcooking
Nutrition Information
| Nutrient | Amount |
|---|---|
| Calories | 310 |
| Total Fat | 12g |
| Saturated Fat | 5g |
| Carbohydrates | 18g |
| Fiber | 3g |
| Sugar | 3g |
| Protein | 38g |
| Sodium | 520mg |
| Cholesterol | 95mg |
These values are approximate and calculated based on USDA data for the ingredients listed. Actual nutrition may vary based on specific brands, cuts, and cooking methods used.
Frequently Asked Questions
Can I make this roast in a slow cooker?
Yes, after searing the roast, transfer it to a slow cooker with all the braising ingredients and cook on low for 6 to 8 hours. Add vegetables during the last hour of cooking to prevent them from becoming mushy.
What if my roast comes out tough?
Tough roast usually means it was cooked too quickly or to too high a temperature, or it was overcooked past the safe doneness level. For future batches, stick to 325 degrees and pull the meat at 160 to 165 degrees internally.
Can I use a different cut of beef?
Absolutely, chuck roast, top round, or brisket all work beautifully with this same method. Cooking times may vary slightly, so use a meat thermometer to guide you rather than relying solely on time.
How do I make the gravy thicker?
After removing the roast and vegetables, strain the braising liquid and simmer it on the stovetop, skimming fat from the surface. For every cup of liquid, whisk together one tablespoon of cornstarch with two tablespoons of cold water and stir it in while simmering until the gravy reaches your desired thickness.
Is bottom round roast a healthy choice?
Bottom round is quite lean compared to other beef cuts, providing 38 grams of protein per serving with moderate fat content. It delivers excellent nutrition for a hearty meal without being excessively high in calories or saturated fat.
Can I cook this roast ahead and reheat it?
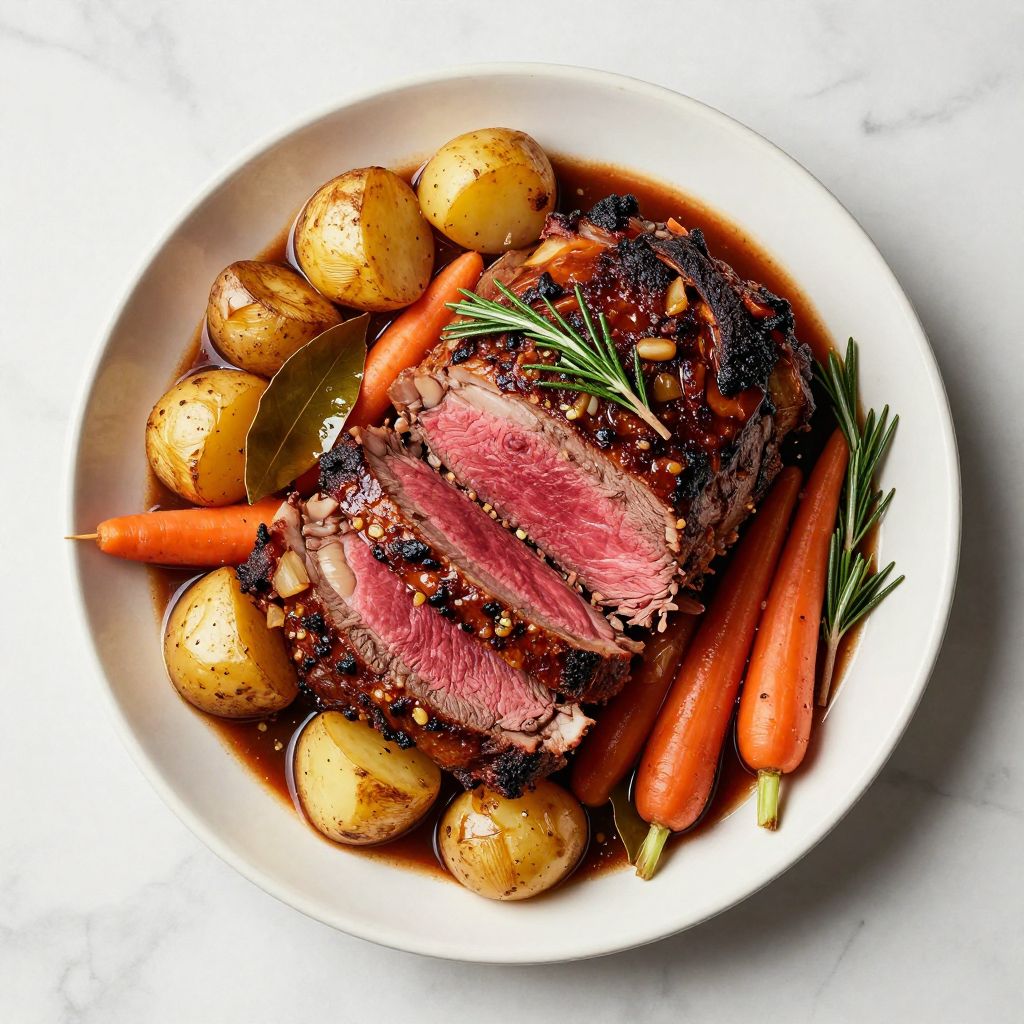
Bottom Round Roast
Ingredients
Equipment
Method
- Preheat the oven to 325°F (165°C) and remove the roast from the refrigerator 30 minutes before cooking.
- Pat the roast dry. Mix kosher salt, black pepper, garlic powder, and dried thyme, then rub the mixture all over the meat.
- Heat olive oil in a Dutch oven over medium-high heat until shimmering.
- Sear the roast for 3–4 minutes per side until deeply browned; transfer to a plate.
- Add onions to the pot and sauté 2–3 minutes, scraping up browned bits.
- Pour in beef broth and red wine, stirring to deglaze; add rosemary sprigs and bay leaves.
- Return the roast to the pot, cover, and braise in the oven for 2 hours.
- Add carrots and potatoes around the roast, cover, and cook 45–60 minutes more until the roast reaches 160–165°F (71–74°C).
- Remove from the oven and let the roast rest in the liquid for 10 minutes.
- Slice the roast against the grain and serve with vegetables and braising liquid.