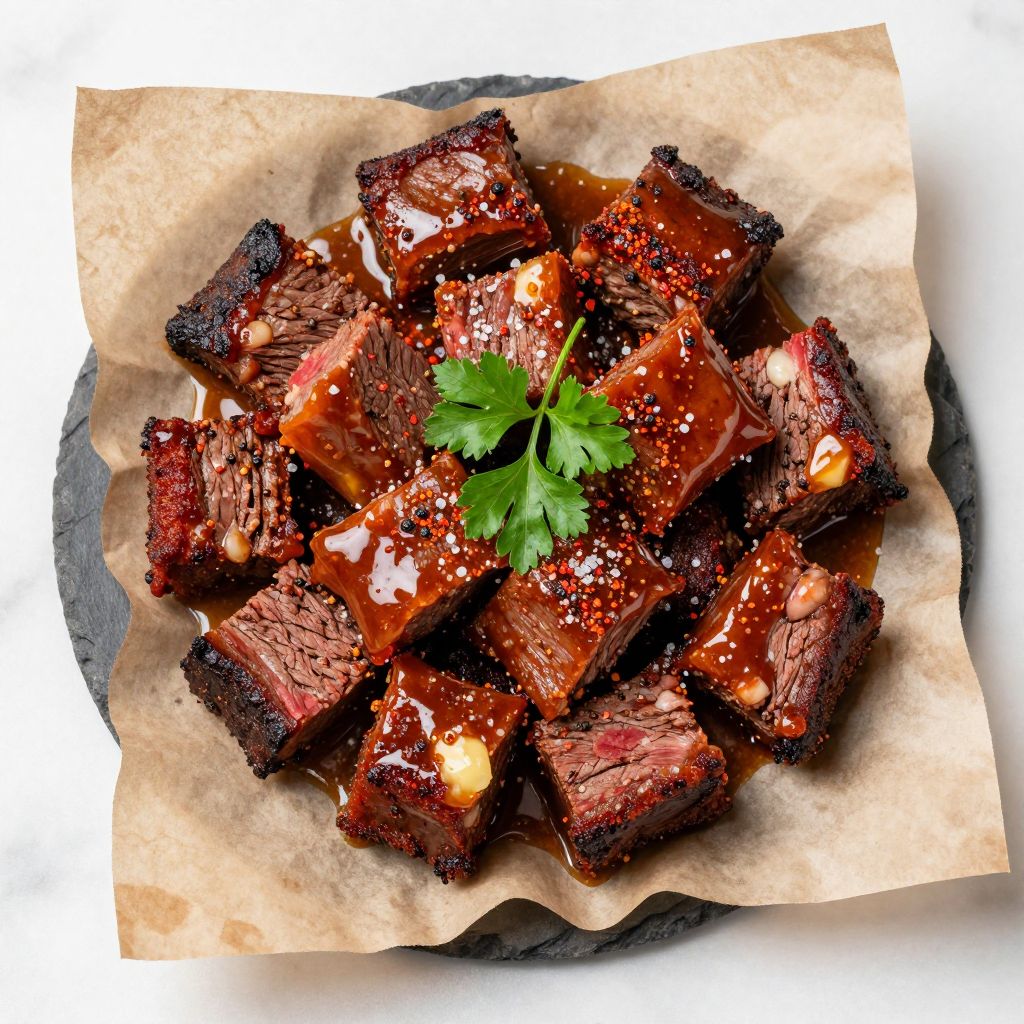
Burnt ends are the crispy, caramelized cubes of brisket point that have become a Kansas City barbecue staple and a must-make for any serious pitmaster. These sticky, smoky, and impossibly tender morsels come together through a two-stage smoking process that transforms tough meat into pure barbecue gold.
Whether you’re smoking for a crowd or just want to impress yourself, this burnt ends recipe delivers restaurant-quality results at home. Let’s walk through how to create this iconic dish.
Why You’ll Love This Recipe
Burnt ends offer the best of both worlds: the deep smoke flavor of low-and-slow barbecue combined with a caramelized, candy-like exterior that keeps you reaching for more.
- Minimal ingredient list that lets the brisket and smoke shine
- Two-stage cooking method that builds complex flavors
- Tender, melt-in-your-mouth texture with a satisfying bark
- Freezer-friendly and perfect for meal prep
- Impresses guests and elevates your barbecue credibility instantly
My Experience Making This Recipe
The first time I made burnt ends, I’ll admit I was nervous about cutting into a perfectly smoked brisket point. Once I pulled those caramelized cubes out of the smoker, the sticky glaze coating my hands and the smoky aroma filling my backyard, all doubt vanished.
My friends devoured them in minutes, and one guest actually asked for the recipe written down so he could make them at home. The beauty of burnt ends is that they taste like you’ve been smoking for hours (which you have), but the payoff feels almost too easy.
What surprised me most was how forgiving the process is once you understand the timing. Even with slight variations in temperature or meat size, you end up with something delicious.
Recipe Overview
- Recipe Name: Burnt Ends
- Servings: 8 to 10 people
- Prep Time: 20 minutes
- Cook Time: 6 to 7 hours
- Total Time: 6 hours 30 minutes to 7 hours 30 minutes
- Course: Main Course
- Cuisine: American Barbecue
- Calories per Serving: 380
Equipment You Will Need
- Offset smoker or barrel smoker
- Meat thermometer or instant-read thermometer
- Sharp butcher knife or boning knife
- Large cutting board
- Aluminum foil pan or disposable aluminum tray
- Tongs or long-handled grill fork
- Spray bottle for water or apple juice
- Heat-resistant gloves
- Chimney starter for charcoal (if using charcoal)
- Small bowl for mixing rub
Ingredients for Burnt Ends
For the Brisket and Rub
- One 5 to 7 pound brisket point (the fattier end)
- 3 tablespoons brown sugar
- 3 tablespoons paprika
- 2 tablespoons kosher salt
- 2 tablespoons coarse black pepper
- 1 tablespoon garlic powder
- 1 tablespoon onion powder
- 1 tablespoon cayenne pepper
- Wood for smoking (hickory, oak, or mesquite preferred)
For the Glaze and Finishing
- 1/2 cup barbecue sauce (Kansas City style preferred)
- 1/4 cup honey
- 2 tablespoons butter
- 1 tablespoon apple cider vinegar
- 1/2 teaspoon smoked paprika (optional but recommended)
Ingredient Notes and Substitutions
- Brisket point: This cut has the right fat content and marbling to become tender and flavorful during the long smoke. If unavailable, use brisket flat, though it will be slightly less forgiving and may dry out more easily.
- Brown sugar: Adds sweetness and helps create the caramelized bark you want on burnt ends. You can swap in equal parts white sugar, but brown sugar delivers deeper molasses notes.
- Paprika: Provides color and a subtle smoky undertone that complements the smoking process. Smoked paprika can replace it for extra depth, though regular paprika is more traditional.
- Barbecue sauce: Kansas City style is thicker and sweeter, making it ideal for the second stage glaze. Texas red sauce will work but yields a thinner, less sticky coating.
- Honey: Balances saltiness and helps create a glossy, caramelized finish in the oven. Maple syrup works as a substitute but shifts the flavor profile slightly.
How to Make Burnt Ends
Step 1: Prepare Your Smoker
Fire up your smoker to 250 degrees Fahrenheit about 30 to 45 minutes before you plan to cook. You want a steady, consistent temperature because fluctuations will throw off your timing and meat texture.
Add your choice of wood chips or chunks to the firebox. Hickory or oak provides clean smoke that won’t overpower the beef, while mesquite delivers bolder flavor if you prefer that profile.
Step 2: Trim and Season the Brisket Point
Remove the brisket point from your cooler and pat it dry with paper towels. Moisture on the surface prevents good bark formation, so don’t skip this step.
Mix the brown sugar, paprika, salt, pepper, garlic powder, onion powder, and cayenne in a small bowl. Rub the entire surface of the meat generously, making sure to work the seasoning into all the crevices and corners.
Step 3: Start the First Smoke Phase
Place the brisket point fat-side up on your smoker grate, as far from the heat source as possible. Insert your meat thermometer into the thickest part without touching bone.
Let the brisket smoke undisturbed for about 4 to 5 hours at 250 degrees. You’re looking for the internal temperature to reach 185 to 190 degrees and the bark to be dark and firm to the touch.
Step 4: Check Progress and Spritz if Needed
After the first 2 hours, you can optionally spritz the brisket with apple juice or water every hour to help develop the bark and keep it moist. This step is not required but many pitmasters swear by it.
Use tongs to avoid puncturing the meat surface, and return it to the same position each time. If your smoker temperature dips below 240 degrees, add more charcoal or wood to bring it back to target.
Step 5: Remove and Cool the Brisket
Once the brisket reaches 185 to 190 degrees internally, remove it from the smoker and place it on a cutting board. Let it rest for 10 to 15 minutes so the juices redistribute and the meat firms up slightly for cutting.
This rest period makes slicing cleaner and prevents the cubes from falling apart when you handle them next.
Step 6: Cut into Burnt Ends
Using a sharp butcher knife, trim away the thick layer of fat on the outside of the brisket point. Cut the meat into roughly 1-inch cubes, leaving just a thin cap of fat on each piece for flavor and texture.
Don’t stress about perfect uniformity; slightly irregular cubes will cook at slightly different rates and give you variety in texture, which is actually desirable. Aim for pieces between three-quarters inch and 1.25 inches across.
Step 7: Make the Glaze and Load the Pan
In a small bowl, combine the barbecue sauce, honey, butter, and apple cider vinegar. Whisk together until the butter melts and everything blends smoothly, creating a thick, pourable glaze.
Layer the brisket cubes into an aluminum foil pan, cut-side down. Pour the glaze over the top and fold in the cubes gently with a spatula to coat everything evenly.
Step 8: Second Smoke Phase with Glaze
Return the pan to your smoker (still at 250 degrees) and cook uncovered for 1 to 2 hours. The glaze will bubble, caramelize, and create sticky, candy-like coating on each cube as the edges curl and char slightly.
After 45 minutes, give the pan a gentle stir with tongs to redistribute the glaze and ensure even cooking. Check around 90 minutes; the burnt ends are done when the glaze has darkened and thickened significantly and the cubes are tender all the way through.
Step 9: Final Finish and Rest
Pull the pan from the smoker and let the burnt ends sit for 5 minutes so the glaze sets slightly. This helps prevent them from sliding off your plate or tongs when you serve them.
If the glaze is still too runny, return the pan to the smoker for another 15 to 20 minutes. The goal is a thick, sticky coating that clings to each piece.
Pro Tip: The true secret to burnt ends is not rushing the second phase. Those final 1 to 2 hours of caramelization in the glaze transform good smoked brisket into legendary burnt ends.
Tips for the Best Burnt Ends
- Choose a brisket point with visible marbling and a fat cap at least a quarter-inch thick. Lean meat will dry out, but proper fat renders during cooking and keeps the cubes tender and juicy.
- Maintain a steady smoker temperature between 240 and 260 degrees for the entire cook. Fluctuations of more than 20 degrees will extend your cooking time unpredictably.
- Don’t open your smoker unnecessarily during the first phase. Every time you lift the lid, you lose heat and smoke, adding 10 to 15 minutes to your total cook time.
- Taste your barbecue sauce before using it for the glaze. If it’s already very salty, reduce the salt in your rub slightly to avoid over-salting the final dish.
- Use an instant-read meat thermometer to verify doneness rather than relying on time alone. Every smoker, fuel source, and weather condition affects cooking speed.
- Save any leftover glaze from the pan after cooking and serve it on the side as a dipping sauce for extra flavor.
Common Mistakes to Avoid
- Using brisket flat instead of point: The flat doesn’t have enough fat to stay moist through long smoking, and your burnt ends will taste dry and stringy instead of tender.
- Cutting cubes too large or too small: Oversized pieces won’t caramelize properly in the glaze phase, while tiny cubes burn and fall apart. Aim for roughly one inch as your target.
- Skipping the rest after the first smoke phase: Slicing warm meat causes it to fall apart and lose juices. A 10 to 15 minute rest makes cutting clean and easy.
- Rushing the glaze phase: Many home cooks pull burnt ends after just 45 minutes because they think they’re done. The magic happens in that second hour when the glaze bubbles, reduces, and caramelizes into a dark, sticky coating.
- Using thin, runny barbecue sauce for the glaze: Thin sauce drips off the cubes and burns in the pan instead of coating them. Choose a thick, syrupy sauce or add honey and butter to thicken it up.
Serving Suggestions
Burnt ends shine brightest served hot and sticky, ideally on a platter lined with butcher paper to keep everything casual and fun. Pair them with classic barbecue sides that complement the smoke and sweetness without competing for attention.
- Coleslaw with a vinegar-based dressing cuts through the richness and cleanses your palate between bites
- Cornbread or jalapeño cheddar cornbread soaks up any glaze drippings and adds a subtle sweetness
- Baked beans with brown sugar and bacon echo the sweet, smoky flavors of the burnt ends
- Pickles and pickled onions provide bright acidity that balances the heavy, caramelized meat
- Mac and cheese with a crispy breadcrumb topping delivers creamy comfort that rounds out the meal
Variations to Try
- Texas burnt ends: Skip the barbecue sauce glaze and finish with just butter, brown sugar, and a touch of cayenne for a drier, spicier crust that highlights the smoky bark.
- Bourbon-glazed burnt ends: Replace the barbecue sauce with a mixture of bourbon, butter, brown sugar, and a dash of bitters for a sophisticated, boozy edge.
- Spicy burnt ends: Add extra cayenne, fresh jalapeños, and habanero hot sauce to the glaze for a slow-building heat that creeps up as you eat.
- Coffee-rubbed burnt ends: Mix cocoa powder and instant espresso powder into your dry rub to add depth and bitterness that balances the sweet glaze.
- Korean-style burnt ends: Glaze with gochujang, honey, soy sauce, and sesame oil for a sweet, spicy, umami-rich coating that feels completely different from traditional barbecue.
Dietary Adaptations
- Gluten-free: Most barbecue sauces contain gluten, so check the label or make your own sauce from ketchup, honey, and vinegar to keep burnt ends safe for gluten-free diets.
- Dairy-free: Omit the butter from the glaze and increase the honey slightly to compensate for the richness and binding power it provides.
- Lower sugar: Use sugar-free barbecue sauce and reduce honey to one tablespoon, replacing it with additional apple cider vinegar for tang and depth without excess sweetness.
- Low-carb or keto: These burnt ends are already relatively low-carb due to the meat, but reducing the barbecue sauce and honey significantly and using a keto-friendly sauce keeps carbs minimal while sacrificing some of that signature sticky glaze texture.
Storage and Reheating
Refrigerator
Store leftover burnt ends in an airtight container for up to 4 days. The glaze will congeal and thicken as they cool, which is completely normal and actually helps them hold together.
- Cool completely before covering to prevent condensation
- Store the pan drippings in a separate container to reheat together
- Transfer to a plate and separate any pieces stuck together before reheating
Freezer
Burnt ends freeze beautifully for up to 3 months when stored properly. Lay them flat on a parchment-lined baking sheet to freeze individually, then transfer to a freezer bag once solid.
- Label the bag with the date so you use them within 3 months
- Thaw overnight in the refrigerator before reheating for best texture
- Thawing in the refrigerator keeps the meat tender; thawing at room temperature can lead to moisture loss
Reheating
The best method is low-and-slow in a 300-degree oven for 15 to 20 minutes, covered loosely with foil to prevent drying. This brings burnt ends back to nearly their original texture and temperature without overheating the glaze.
- Add a splash of water or apple juice to the pan to help rehydrate the meat
- Microwave reheating is quick but can make the meat rubbery if overdone
- Reheat on a stovetop over low heat with a lid to maintain moisture without scorching the glaze
Nutrition Information
| Nutrient | Amount |
|---|---|
| Calories | 380 |
| Total Fat | 22g |
| Saturated Fat | 9g |
| Carbohydrates | 12g |
| Fiber | 0g |
| Sugar | 10g |
| Protein | 38g |
| Sodium | 620mg |
| Cholesterol | 115mg |
These values are approximate and based on standard ingredient sizes and measurements. Actual nutrition will vary depending on your specific ingredients, fat content of your meat, and how much glaze each serving absorbs.
Frequently Asked Questions
Can I make burnt ends on a gas grill?
Yes, though you lose some of the traditional smoke flavor. Use a smoke box filled with soaked wood chips and keep one burner at medium heat while keeping the others off, treating the grill like an indirect-heat oven at 250 degrees.
What if my brisket point is smaller than 5 pounds?
A smaller point will cook faster, potentially finishing in 3 to 4 hours instead of 5. Check the internal temperature starting at the 3-hour mark and proceed to cutting as soon as you hit 185 to 190 degrees to avoid overdrying the meat.
Can I prep the brisket and rub it the
Burnt Ends
Ingredients
Equipment
Method
- Fire up your smoker to 250 degrees Fahrenheit about 30 to 45 minutes before cooking. Add your choice of wood chips or chunks to the firebox. Hickory or oak provides clean smoke, while mesquite delivers bolder flavor.
- Remove the brisket point from cooler and pat dry with paper towels. Mix brown sugar, paprika, salt, pepper, garlic powder, onion powder, and cayenne in a small bowl. Rub the entire surface generously, working seasoning into all crevices.
- Place the brisket point fat-side up on smoker grate, as far from heat source as possible. Insert meat thermometer into thickest part. Let smoke undisturbed for 4 to 5 hours at 250 degrees until internal temperature reaches 185 to 190 degrees.
- After first 2 hours, optionally spritz brisket with apple juice or water every hour to help develop bark. Use tongs to avoid puncturing meat surface. If smoker temperature dips below 240 degrees, add more charcoal or wood.
- Once brisket reaches 185 to 190 degrees internally, remove from smoker and place on cutting board. Let rest for 10 to 15 minutes so juices redistribute and meat firms up slightly for cutting.
- Using sharp butcher knife, trim away thick layer of fat on outside of brisket point. Cut meat into roughly 1-inch cubes, leaving thin cap of fat on each piece. Aim for pieces between three-quarters inch and 1.25 inches across.
- In small bowl, combine barbecue sauce, honey, butter, and apple cider vinegar. Whisk together until butter melts and everything blends smoothly. Layer brisket cubes into aluminum foil pan cut-side down. Pour glaze over top and fold cubes gently to coat.
- Return pan to smoker at 250 degrees and cook uncovered for 1 to 2 hours. After 45 minutes, give pan gentle stir with tongs to redistribute glaze. Check around 90 minutes; burnt ends are done when glaze has darkened and thickened and cubes are tender.
- Pull pan from smoker and let burnt ends sit for 5 minutes so glaze sets slightly. If glaze is still too runny, return pan to smoker for another 15 to 20 minutes until thick and sticky coating clings to each piece.