King Arthur Bread Recipe is a rustic, crusty loaf that rivals anything you’d find at a professional bakery. This simple yet rewarding bread uses just four ingredients and a long, slow fermentation to develop deep, complex flavor.
If you’ve been intimidated by bread baking, this recipe proves that you don’t need fancy equipment or years of experience to create something truly special. The magic happens through time and technique, not complicated steps.
Why You’ll Love This Recipe
This bread delivers bakery-quality results at home with minimal fuss and maximum flavor payoff. Once you master it, you’ll find yourself making it constantly.
- Requires only four basic ingredients: flour, water, salt, and yeast.
- Develops incredible flavor and texture through overnight cold fermentation.
- Creates a crispy, shattered crust and open crumb structure.
- Makes your kitchen smell absolutely amazing.
- Costs just pennies per loaf compared to buying artisan bread.
My Experience Making This Recipe
I first made this bread on a whim after watching a video about no-knead techniques. I mixed the dough in five minutes, forgot about it overnight, and woke up to a bowl of bubbly, fragrant dough that practically made itself.
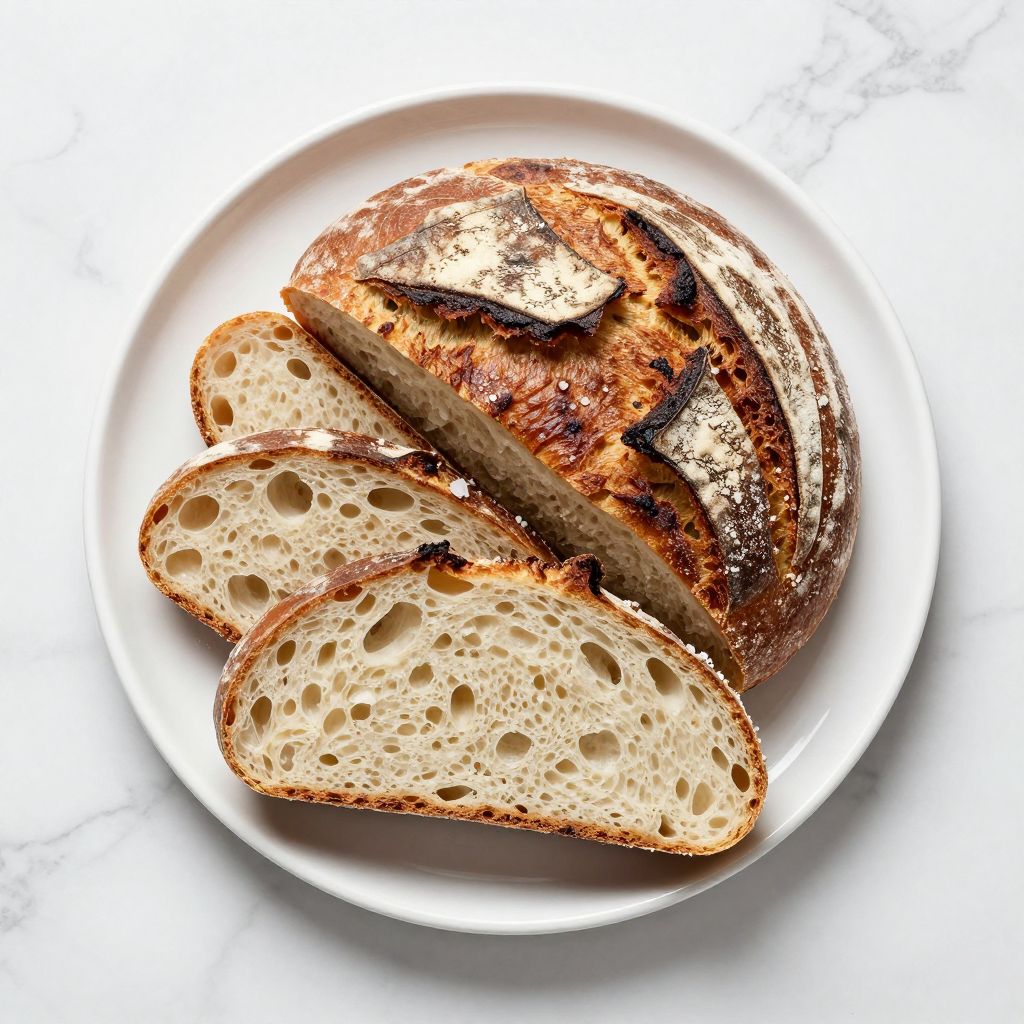
The transformation during baking amazed me most. The pale dough went into the oven and emerged with a mahogany crust so crispy it shattered under my knife.
My family demolished half the loaf while it was still warm, and the other half lasted three days before we realized we’d finished it. Now I make this bread at least twice a month, and friends always ask for the recipe.
Recipe Overview
- Recipe Name: King Arthur Bread Recipe
- Servings: 1 loaf (12 slices)
- Prep Time: 15 minutes plus overnight fermentation
- Cook Time: 45 minutes
- Total Time: 12 hours 50 minutes
- Course: Bread
- Cuisine: American Artisan
- Calories per Serving: 160
Equipment You Will Need
- Large mixing bowl
- Dutch oven with lid (4 to 6 quarts)
- Kitchen scale (highly recommended for accuracy)
- Measuring cups and spoons
- Wooden spoon or spatula
- Bench scraper or dough knife
- Instant-read thermometer
- Oven mitts or kitchen towels
Ingredients for King Arthur Bread Recipe
- All-purpose flour: 3 cups (375 grams)
- Water: 1.5 cups (355 milliliters), lukewarm
- Salt: 1.5 teaspoons (9 grams)
- Instant yeast: 0.5 teaspoon (2 grams)
Ingredient Notes and Substitutions
- All-purpose flour provides the right balance of protein and gluten development without being too heavy or too light. You can substitute bread flour (which has more protein) for a chewier crumb, though you may need an extra tablespoon of water.
- Water temperature matters because warm water activates yeast faster, while cool water slows fermentation. If your kitchen is cold, use slightly warmer water (around 75 to 80 degrees Fahrenheit).
- Salt strengthens gluten and adds flavor, but don’t skip it or reduce it significantly. Sea salt and kosher salt work equally well here.
- Instant yeast (also called bread machine yeast) dissolves quickly and reliably. Active dry yeast works too but requires slightly longer to activate; fresh yeast would need adjustment and isn’t recommended for beginners.
How to Make King Arthur Bread Recipe
Step 1: Mix the Dough
Combine flour, water, and yeast in a large bowl, stirring until everything is wet and shaggy. Don’t worry about lumps or streaks of dry flour; you’re just mixing, not kneading yet.
Step 2: Autolyse Rest
Cover the bowl and let the dough rest at room temperature for 12 to 18 hours. This long rest is called autolyse, and it allows the flour to fully hydrate and gluten to develop naturally without any kneading.
Step 3: Add Salt
Sprinkle the salt over the dough and work it in with a wet hand or dough knife using a pinching and folding motion. The dough will feel wetter initially, but the salt dissolves quickly into the moisture.
Step 4: Perform Stretch and Folds
Grab one side of the dough, stretch it up, and fold it over itself. Rotate the bowl a quarter turn and repeat four times total.
This technique replaces traditional kneading and builds strength into the gluten. Rest for 30 minutes, then repeat this stretch-and-fold sequence two more times, resting 30 minutes between each set.
Step 5: Final Bulk Fermentation
Let the dough rest for another 2 to 3 hours at room temperature after the final stretch and fold. The dough should look puffy and feel airy when you poke it gently.
Step 6: Shape the Dough
Dump the dough onto a lightly floured surface and gently shape it into a round boule by folding the edges toward the center. Flip it seam-side down and let it rest on the counter for 20 minutes.
This rest loosens the dough so you can shape it properly without degassing it completely. The gentle handling preserves the open crumb structure you’ve built through fermentation.
Step 7: Final Shaping and Cold Proof
Shape the round again more firmly by pulling the top toward you and sealing the seam underneath. Place the dough seam-side up in a flour-dusted banneton basket or a bowl lined with a towel.
Cover loosely with plastic wrap and refrigerate for at least 8 hours, preferably overnight. The cold temperature slows yeast activity while enzymes continue to work, deepening flavor and making the dough easier to score.
Step 8: Preheat and Score
Place your Dutch oven in the oven and preheat to 500 degrees Fahrenheit for at least 45 minutes. A very hot Dutch oven traps steam, which is essential for developing that shattered crust.
When ready to bake, carefully invert the cold dough onto parchment paper. Score the top with a sharp knife or lame, making a single slash about a quarter-inch deep at a 45-degree angle.
Step 9: Bake Covered
Carefully transfer the parchment and dough into the preheated Dutch oven. Reduce heat to 450 degrees Fahrenheit, cover with the lid, and bake for 20 minutes.
The closed environment traps steam released from the dough, allowing the crust to expand and brown evenly. This is where the magic happens.
Step 10: Bake Uncovered and Cool
Remove the lid and continue baking for 20 to 25 minutes until the crust is deep mahogany brown. The loaf should sound hollow when tapped on the bottom, and an instant-read thermometer inserted into the center should read around 205 to 210 degrees Fahrenheit.
Cool the bread completely on a wire rack before slicing. I know it’s tempting to cut into warm bread, but waiting lets the crumb set properly so it doesn’t tear or crumble.
Pro Tip: Cold fermentation in the refrigerator is your secret weapon for deeper flavor and easier handling. The dough becomes firm and doesn’t need babysitting while you sleep, and you can bake it straight from the fridge without bringing it to room temperature.
Tips for the Best King Arthur Bread Recipe
- Use a kitchen scale for flour and water measurements if possible. Volume measurements can vary by up to 10 percent depending on how tightly you pack the flour, which throws off the hydration ratio.
- Keep your kitchen at a consistent temperature during fermentation. If your kitchen is cold (below 68 degrees Fahrenheit), add an hour or two to all fermentation times.
- Don’t skip the stretch and folds. They build gluten strength without aggressive kneading, creating the open crumb structure that makes this bread special.
- If your dough seems too wet to handle after the first 12 hours, that’s actually perfect. High-hydration doughs create more open crumbs, so trust the process.
- Invest in a good Dutch oven. The heavy bottom distributes heat evenly, and the tight-fitting lid creates perfect steam conditions that you can’t replicate in a regular oven.
- Pull the bread when the crust is darker than you think it should be. Dark crust means maximum flavor development and better structural support for that open crumb.
Common Mistakes to Avoid
- Using water that’s too hot kills the yeast before fermentation begins. Lukewarm water between 70 and 80 degrees Fahrenheit is ideal.
- Skipping or rushing the overnight fermentation defeats the purpose of this recipe. The long rest develops flavor that quick breads simply cannot achieve.
- Overworking the dough during shaping degasses it and creates a dense crumb. Handle it gently and let it rest between shaping steps.
- Opening the Dutch oven lid before 20 minutes are up releases all the steam you’ve built up. Resist the urge to peek at your bread.
- Slicing the bread while it’s still hot causes the crumb to compress and tear. Cool it completely, which takes about an hour, then slice with a serrated knife using a sawing motion.
Serving Suggestions
This bread is versatile enough to work with almost any meal, from breakfast through dinner. Serve it while still slightly warm from the oven for maximum crispness and aroma.
- Toast thick slices and top with butter and jam for breakfast.
- Use for open-faced sandwiches with quality deli meats, cheese, and greens.
- Tear off chunks to accompany soups, stews, and braises.
- Make breadcrumbs from day-old slices by processing in a food processor for coating fried foods.
- Slice and serve alongside olive oil and sea salt for a simple aperitif.
Variations to Try
- Whole Wheat King Arthur Bread: Replace 25 percent of the all-purpose flour with whole wheat flour for a nuttier flavor and denser crumb. You may need to add slightly more water since whole wheat absorbs more liquid.
- Seeded Crust: Right before scoring, brush the dough lightly with water and press sesame seeds, poppy seeds, or a seed blend onto the surface for visual interest and extra texture.
- Herb and Olive Bread: After the first stretch-and-fold, work in 0.5 cup of pitted Kalamata olives and 2 tablespoons of chopped fresh rosemary or thyme. The herbs add brightness and the olives create pockets of briny flavor.
- Sourdough Conversion: Skip the instant yeast and instead feed a sourdough starter 4 to 6 hours before mixing. Use 0.5 cup of active starter in place of the yeast for a tangier, more complex flavor profile.
- Jalapeño Cheddar Bread: Add 1 cup of shredded sharp cheddar cheese and 2 to 3 diced fresh jalapenos after the salt incorporation. The cheese melts into the crumb and the heat builds depth.
Dietary Adaptations
- Gluten-Free: Substitute a one-to-one gluten-free flour blend that includes xanthan gum, then increase water to 1.75 cups since gluten-free flour absorbs more moisture. The texture won’t be quite as open, but it will still be excellent.
- Dairy-Free: This recipe contains no dairy, so it’s naturally dairy-free. If you want to serve it with a spread, use dairy-free butter or olive oil.
- Vegan: This recipe is already vegan since it uses only flour, water, salt, and yeast with no animal products.
- Low-Carb/Keto: Traditional bread doesn’t fit keto macros. Try using almond flour or a specialized low-carb flour blend, though the result will be quite different from the original recipe.
Storage and Reheating
Refrigerator
Wrap cooled bread tightly in plastic wrap or place it in an airtight container. It keeps for up to 5 days in the refrigerator, though it gradually stales.
- Slice before storing if you prefer to toast individual slices later.
- The crust softens in the fridge, so you lose some crispness.
Freezer
Wrap the cooled loaf tightly in plastic wrap, then in aluminum foil, and freeze for up to 3 months. This method preserves freshness far better than refrigeration.
- Slice before freezing so you can thaw individual slices as needed.
- Frozen bread thaws at room temperature in about an hour.
Reheating
Wrap the bread (whole or sliced) in a damp kitchen towel and place it in a 350-degree Fahrenheit oven for 10 to 15 minutes. The moisture re-softens the crumb and recrisps the crust.
- Alternatively, slice and toast in a toaster or toaster oven for a quicker result.
- Avoid the microwave, which makes bread tough and chewy.
Nutrition Information
| Nutrient | Amount |
|---|---|
| Calories | 160 |
| Total Fat | 0.5g |
| Saturated Fat | 0g |
| Carbohydrates | 32g |
| Fiber | 1g |
| Sugar | 0g |
| Protein | 5g |
| Sodium | 290mg |
| Cholesterol | 0mg |
Nutrition values are estimates based on standard ingredients and a yield of 12 slices per loaf. Actual values vary depending on brand, hydration level, and how you slice your loaf.
Frequently Asked Questions
Can I use a different type of flour?
Bread flour works beautifully and creates a chewier crumb with more gluten development. Whole wheat flour can be substituted for up to 25 percent of the all-purpose flour, though you’ll need to adjust water and extend fermentation times slightly.
What if I don’t have a Dutch oven?
You can create a makeshift steam chamber by placing a baking stone in the oven and pouring hot water into a pan below it, then baking the dough on the stone. The results won’t be quite as dramatic, but you’ll still get a respectable crust.
How do I know when the dough is done fermenting?
The dough should feel puffy and jiggly when you gently poke it, and it should spring back slowly rather than immediately. You’re aiming for about 30 to 50 percent volume increase, not a dramatic doubling.
Can I make this dough in a stand mixer?
Absolutely. Mix on low speed for 5 to 7 minutes until the dough comes together, then proceed with the overnight fermentation. The stretch and folds still help build strength during bulk fermentation.
Why does my bread have a gummy crumb?
The most common cause is underbaking. Make sure the internal temperature reaches 205 to 210 degrees Fahrenheit and the crust is deep brown. Cooling completely before slicing also prevents a gummy texture by allowing the crumb structure to set.
Can I speed up this recipe?
You can reduce fermentation times by 2 to 3 hours, but you’ll sacrifice flavor development. The long, cold fermentation is what makes this bread taste so good, so rushing it isn’t recommended if you want the full King Arthur experience.
Final Thoughts
This King Arthur Bread Recipe proves that simple ingredients and patience create results that rival expensive bakeries. You don’t need complicated techniques or expensive equipment to bake exceptional bread at home.
Start with this recipe, master it, then experiment with variations and modifications. Before long, you’ll find yourself baking bread regularly and wondering why you ever bought store-bought loaves in the first place.
King Arthur Bread Recipe
Ingredients
Equipment
Method
- In a large mixing bowl, combine flour, water, and yeast; stir until a shaggy dough forms, about 2 minutes.
- Cover the bowl and let the dough rest at room temperature for 12 to 18 hours (autolyse phase).
- Sprinkle salt over the dough, then use a damp hand to pinch and fold until salt is incorporated, 1 minute.
- Perform 4 stretch-and-folds, rotating the bowl a quarter turn each time; rest 30 minutes and repeat twice more.
- After the final fold, let the dough bulk-ferment for 2 to 3 hours until puffy and airy.
- Turn the dough onto a lightly floured surface; gently shape into a round, seam side down, and rest 20 minutes.
- Tighten the round, place seam side up in a floured banneton or towel-lined bowl, cover, and refrigerate 8 hours or overnight.
- Place a Dutch oven in the oven and preheat to 500 °F (260 °C) for 45 minutes.
- Invert cold dough onto parchment, score a 1⁄4-inch-deep slash, and carefully lower into the hot Dutch oven; reduce oven to 450 °F (232 °C).
- Bake covered for 20 minutes, then remove lid and bake 20–25 minutes more until deep mahogany and internal temperature is 205–210 °F (96–99 °C).
- Transfer loaf to a wire rack and cool completely, at least 1 hour, before slicing.