Benihana fried rice is the showstopping teppanyaki side dish that steals the spotlight at Japanese steakhouses worldwide. This recipe captures that signature fried rice with butter, soy sauce, and perfectly cooked eggs that you’ve watched chefs prepare right in front of you on the griddle.
Learning to make this at home means recreating those theatrical moments and restaurant-quality flavors in your own kitchen. Let’s break down exactly how to nail this beloved classic.
Why You’ll Love This Recipe
This fried rice delivers restaurant quality without the restaurant price tag, and it comes together faster than you’d expect.
- Tastes exactly like the Benihana version with buttery, slightly crispy edges and fluffy rice
- Uses simple ingredients you likely have on hand already
- Cooks in under 15 minutes once your rice is ready
- Pairs perfectly with grilled proteins and steamed vegetables
- Leftovers reheat beautifully and taste even better the next day
My Experience Making This Recipe
I first attempted this recipe after eating at Benihana and feeling slightly robbed by the bill. The magic I witnessed on the teppan looked complicated, but I quickly realized it’s actually straightforward cooking with confident technique.
My first batch was too wet because I used warm rice straight from the cooker. That mistake taught me why day-old chilled rice is non-negotiable here.
Once I nailed the rice temperature and got my butter melting at the right speed, the whole dish clicked into place. My family now requests this more often than we actually eat out, which says everything.
Recipe Overview
- Recipe Name: Benihana Fried Rice
- Servings: 4 to 6 servings
- Prep Time: 10 minutes
- Cook Time: 12 minutes
- Total Time: 22 minutes
- Course: Side dish
- Cuisine: Japanese teppanyaki
- Calories per Serving: 285 calories
Equipment You Will Need
- Large flat-top griddle or cast iron skillet
- Wooden spatulas or metal scrapers
- Measuring cups and spoons
- Small bowl for whisking eggs
- Cutting board and sharp knife
- Colander for draining rice
Ingredients for Benihana Fried Rice
- 3 cups cooked day-old white rice, chilled and broken into individual grains
- 4 tablespoons butter, divided
- 3 large eggs, whisked together
- 1/2 cup diced onion
- 1/2 cup diced carrots
- 1/2 cup diced zucchini
- 2 cloves minced garlic
- 3 tablespoons soy sauce
- 1 tablespoon sesame oil
- 1/4 teaspoon white pepper
- 2 tablespoons sliced green onions, for garnish
- Salt to taste
Ingredient Notes and Substitutions
- Day-old chilled rice: Cold rice grains stay separate and crispy instead of clumping together in a mushy mass. You can spread freshly cooked rice on a sheet pan and refrigerate it for 2 hours if you lack day-old rice.
- Butter: This is what makes Benihana fried rice taste like Benihana fried rice. Vegetable oil tastes completely different and misses the rich, toasted flavor that defines this dish.
- Eggs: These bind the rice and add richness and protein. Scrambled eggs work if you prefer, but whisked eggs distribute more evenly throughout.
- Sesame oil: A small amount adds the authentic nutty, toasted finish that separates this from generic fried rice. Do not skip this or substitute it with regular oil.
- White pepper: This adds heat without visible black specks and tastes lighter than black pepper. Black pepper works if you have nothing else on hand.
How to Make Benihana Fried Rice
Step 1: Prepare Your Ingredients
Dice your onion, carrots, and zucchini into small, uniform pieces about the size of a pea. This ensures everything cooks at the same rate and gives you that signature diced vegetable look you see at the restaurant.
Whisk your eggs together in a small bowl until completely combined with no visible whites. Mince your garlic finely so it distributes evenly and doesn’t create chunks.
Step 2: Get Your Rice Ready
Remove your chilled rice from the refrigerator and break it apart with your fingers so the grains separate completely. Lumpy cold rice will not fry properly and will create dense clumps instead of individual fluffy grains.
Spread the rice on a plate or cutting board so it’s easy to grab while cooking. You’ll be working quickly once the griddle gets hot, so having everything within arm’s reach matters.
Step 3: Heat Your Griddle
Place your flat-top griddle or large cast iron skillet over medium-high heat for about 2 to 3 minutes. The surface should be hot enough that a drop of water sizzles immediately, but not so hot that butter burns instantly.
If you’re using a regular skillet, work in batches to avoid overcrowding. Benihana uses massive flat cooking surfaces, so give yourself space to move the rice around.
Step 4: Cook the Vegetables
Add 1 tablespoon of butter to your hot griddle and let it melt completely until it’s foaming. Add your diced onion, carrot, and zucchini, plus the minced garlic, all at once.
Stir constantly with a wooden spatula or metal scraper for about 2 to 3 minutes until the vegetables soften and the onion becomes translucent. The garlic should smell fragrant and toasted, not burnt.
Step 5: Push Vegetables to the Side
Push all your cooked vegetables to one side of the griddle, creating an open space for the eggs. This separation lets you scramble the eggs without mixing them into the vegetables too early.
Work quickly here because you want to add the eggs while the griddle is still hot enough to cook them fast.
Step 6: Cook the Eggs
Add another tablespoon of butter to the empty space on your griddle and let it melt. Pour your whisked eggs into the butter immediately.
Scramble the eggs constantly with your spatula, breaking them into small pieces as they cook, about 2 to 3 minutes. The eggs should be completely cooked through with no wet spots remaining.
Step 7: Add the Rice
Add your separated cold rice directly to the griddle, spreading it out evenly over the eggs and vegetables. Add the remaining 2 tablespoons of butter on top of the rice.
Now comes the crucial part: work constantly with your spatulas, chopping and flipping the rice so it breaks up and every grain gets coated with butter and heat. This should take about 4 to 5 minutes of continuous motion.
Step 8: Season and Finish
Drizzle your soy sauce and sesame oil over the rice while still tossing constantly. Add white pepper and taste a small sample to check if you need more salt.
Keep the rice moving for another 1 to 2 minutes until everything is heated through and the soy sauce coats every grain evenly. The rice should smell savory and toasted with that signature buttery aroma.
Pro Tip: Day-old chilled rice is absolutely critical to success here, so plan ahead and refrigerate your cooked rice at least a few hours before cooking, or better yet, make it the day before.
Tips for the Best Benihana Fried Rice
- Use a flat-top griddle instead of a skillet if possible because it gives you more surface area to spread the rice thin, which creates that signature slightly crispy texture with buttery edges.
- Keep the heat at medium-high, not screaming hot, so the rice toasts gently rather than burning while staying moist inside.
- Never stop stirring once the rice hits the griddle because stationary rice sticks and burns while other parts stay cold.
- Taste as you season because soy sauce saltiness varies by brand and you might need less or more than the recipe states.
- Keep all your ingredients prepped and within reach before you start cooking since the actual cooking happens fast and you won’t have time to chop while the griddle’s running.
- If your rice seems too wet or sticky during cooking, spread it thinner on the griddle so the heat can evaporate excess moisture and crisp the edges.
Common Mistakes to Avoid
- Using warm or room-temperature rice instead of chilled rice will result in a mushy, clumpy mess that never crisps up no matter how much you cook it.
- Not breaking the rice into individual grains before cooking creates large clumps that don’t distribute heat evenly and stay dense in the center.
- Adding soy sauce too early burns it slightly and creates a bitter flavor instead of the savory, balanced taste you want.
- Crowding the griddle or skillet means the rice steams instead of fries, so you get soft rice instead of that light, fluffy texture with crispy edges.
- Skipping the sesame oil or using regular oil instead makes the dish taste generic and missing that toasted, nutty finish that makes this recipe special.
Serving Suggestions
Benihana fried rice is the perfect teppanyaki side dish alongside grilled steak, chicken, or shrimp. It also pairs beautifully with steamed vegetables or a fresh salad to round out your Japanese steakhouse experience at home.
- Serve alongside grilled hibachi steak or chicken for an authentic dinner
- Pair with steamed broccoli and garlic butter for a complete teppanyaki spread
- Offer as a side to grilled shrimp or scallops for a lighter meal
- Include with miso soup and edamame for a full Japanese dinner
- Serve at room temperature as a side salad alternative for potlucks or picnics
Variations to Try
- Shrimp Fried Rice: Add diced cooked shrimp to the vegetables in step 4 and cook until heated through, creating a protein-packed main dish instead of a side.
- Spicy Version: Add a pinch of cayenne pepper or a few drops of sriracha mixed into the soy sauce for heat without overpowering the savory flavors.
- Mushroom Fried Rice: Include finely diced shiitake or button mushrooms with the other vegetables, which adds an earthy depth and umami boost.
- Pineapple Fried Rice: Stir in fresh pineapple chunks during the final minute of cooking for a sweet contrast that changes the entire flavor profile.
- Kimchi Fried Rice: Mix in chopped kimchi with the vegetables for a spicy, fermented twist that works especially well with grilled pork.
Dietary Adaptations
- Gluten-free: Use tamari or gluten-free soy sauce instead of regular soy sauce since wheat-based soy sauce contains gluten, and the rest of the recipe is naturally gluten-free.
- Dairy-free: Replace the butter with ghee or coconut oil, though the flavor will shift away from the classic buttery taste and toward something lighter or more tropical.
- Vegan: Skip the eggs entirely or use a vegan egg replacement product, and use vegetable oil or vegan butter instead of dairy butter, accepting that the flavor profile becomes noticeably different from the original.
- Low-carb or Keto: Replace the white rice with cauliflower rice or a low-carb rice alternative, though you’ll need to adjust cooking times since cauliflower rice releases moisture faster and requires less cooking time.
Storage and Reheating
Refrigerator
Store leftover fried rice in an airtight container for up to 4 days. The rice keeps well because the butter and soy sauce act as preservatives.
- Cool the rice to room temperature before storing
- Keep in an airtight container to prevent drying out
- Store away from strong-smelling foods since rice absorbs odors easily
Freezer
Benihana fried rice freezes beautifully for up to 3 months when stored properly. The texture holds up well during freezing and thawing.
- Cool the rice completely before freezing
- Use freezer bags or airtight containers to prevent freezer burn
- Label with the date so you know when you made it
Reheating
The best way to reheat fried rice is on a hot griddle or skillet just like you cooked it originally. This restores the crispy edges and buttery texture that make this dish special.
- Add a small amount of butter to the hot griddle before adding the rice
- Break up any clumps gently while the rice heats through, about 3 to 4 minutes
- Microwave works in a pinch but will soften the texture noticeably
Nutrition Information
| Nutrient | Amount |
|---|---|
| Calories | 285 |
| Total Fat | 11g |
| Saturated Fat | 6g |
| Carbohydrates | 38g |
| Fiber | 1g |
| Sugar | 2g |
| Protein | 6g |
| Sodium | 520mg |
| Cholesterol | 95mg |
These values are estimates based on standard USDA ingredients and serving size of approximately one cup. Actual nutrition varies slightly depending on your specific brands and ingredient measurements.
Frequently Asked Questions
Can I make this recipe with brown rice instead of white rice?
Brown rice will work but tastes noticeably different because it’s nuttier and denser than white rice. The texture also becomes chewier rather than light and fluffy, which changes the whole eating experience.
How far in advance can I prep the rice for this recipe?
Prepare your rice up to 2 days before cooking, as long as you keep it covered in the refrigerator. The longer it sits, the firmer and drier it becomes, which is actually ideal for fried rice.
What happens if I use hot rice instead of cold rice?
Hot rice contains too much moisture and will steam rather than fry, creating a mushy, clumpy texture instead of those light, separated grains. The rice also won’t crisp at the edges no matter how hot your griddle gets.
Can I make this fried rice without a griddle?
A large cast iron skillet or heavy-bottomed stainless steel skillet works fine, but you’ll need to cook in batches since you need plenty of surface area. A griddle gives you more space and better heat distribution all at once.
Why does my fried rice taste different from Benihana even though I follow the recipe?
The biggest difference usually comes from not using enough butter or skipping the sesame oil, both of which create that signature toasted flavor. Also, your griddle temperature or rice moisture might differ slightly from the original.
Can I add soy sauce to the rice before cooking instead of at the end?
Adding soy sauce early will cause it to burn on the hot surface and taste bitter instead of savory and balanced. Always add your seasonings in the final minute or two of cooking so they stay fresh and flavorful.
Final Thoughts
Making Benihana fried rice at home turns a restaurant splurge into an affordable weeknight side dish that tastes exactly like the real thing. Once you nail the basic technique, you’ll find yourself making it constantly because it’s faster and tastier than takeout.
Start with the classic version, then experiment with your own variations once you feel comfortable with the cooking process. Your family will thank you, and you’ll never look at fried rice the same way again.
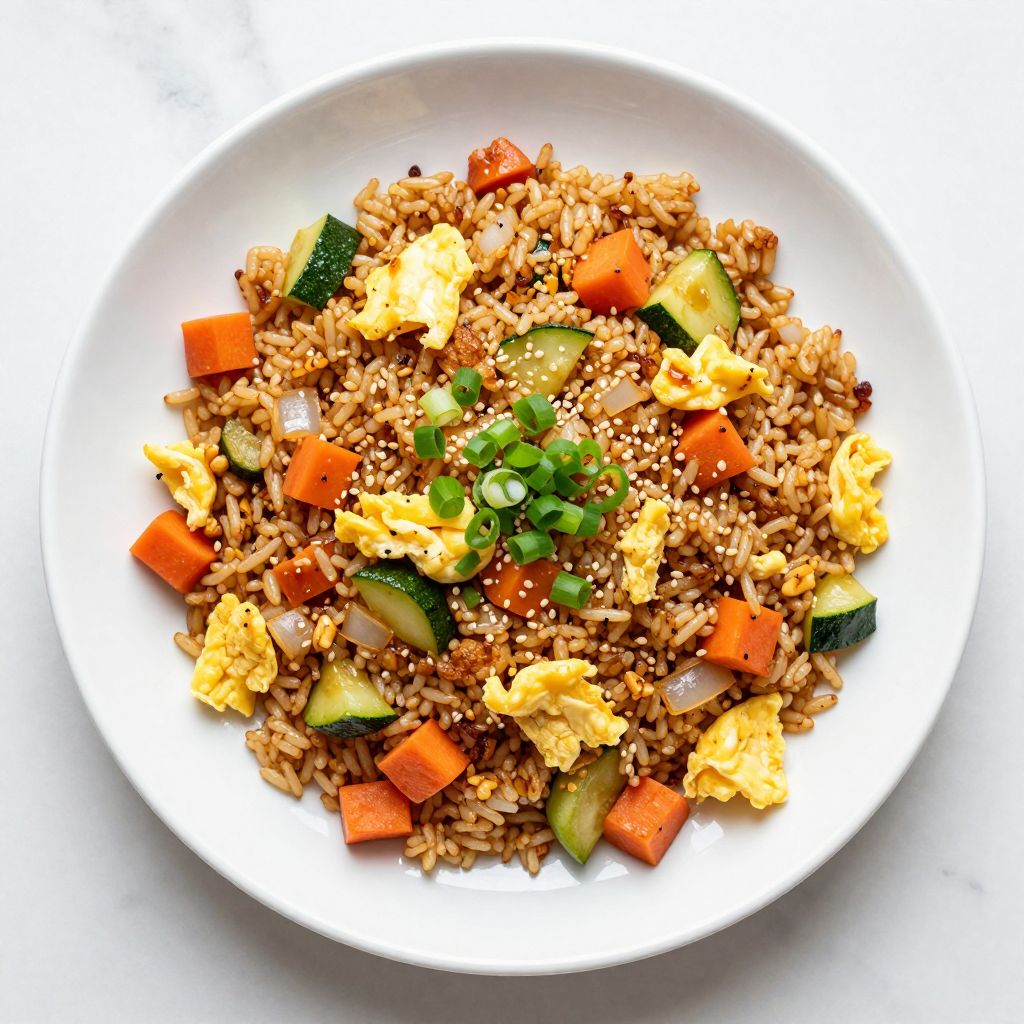
Benihana Fried Rice
Ingredients
Equipment
Method
- Dice the onion, carrots and zucchini into pea-size pieces and finely mince the garlic; whisk the eggs until no streaks remain. (5 minutes)
- Use your fingers to separate the chilled rice into individual grains so no clumps remain. (1 minute)
- Preheat a flat-top griddle or large cast-iron skillet over medium-high heat for 2–3 minutes until a drop of water sizzles on contact.
- Melt 1 tablespoon of butter on the hot surface, add the diced onion, carrot, zucchini and minced garlic, and stir-fry for 2–3 minutes until vegetables are tender and the onion is translucent.
- Push vegetables to one side, add another tablespoon of butter to the empty space, pour in the beaten eggs and scramble for 2–3 minutes until fully cooked.
- Spread the separated rice over the eggs and vegetables, add the remaining 2 tablespoons of butter and stir-fry continuously for 4–5 minutes until the rice is hot and lightly crisped.
- Drizzle soy sauce and sesame oil over the rice, season with white pepper and salt to taste, and toss for 1–2 minutes until every grain is evenly coated.
- Transfer the fried rice to a serving platter and garnish with sliced green onions. Serve immediately.