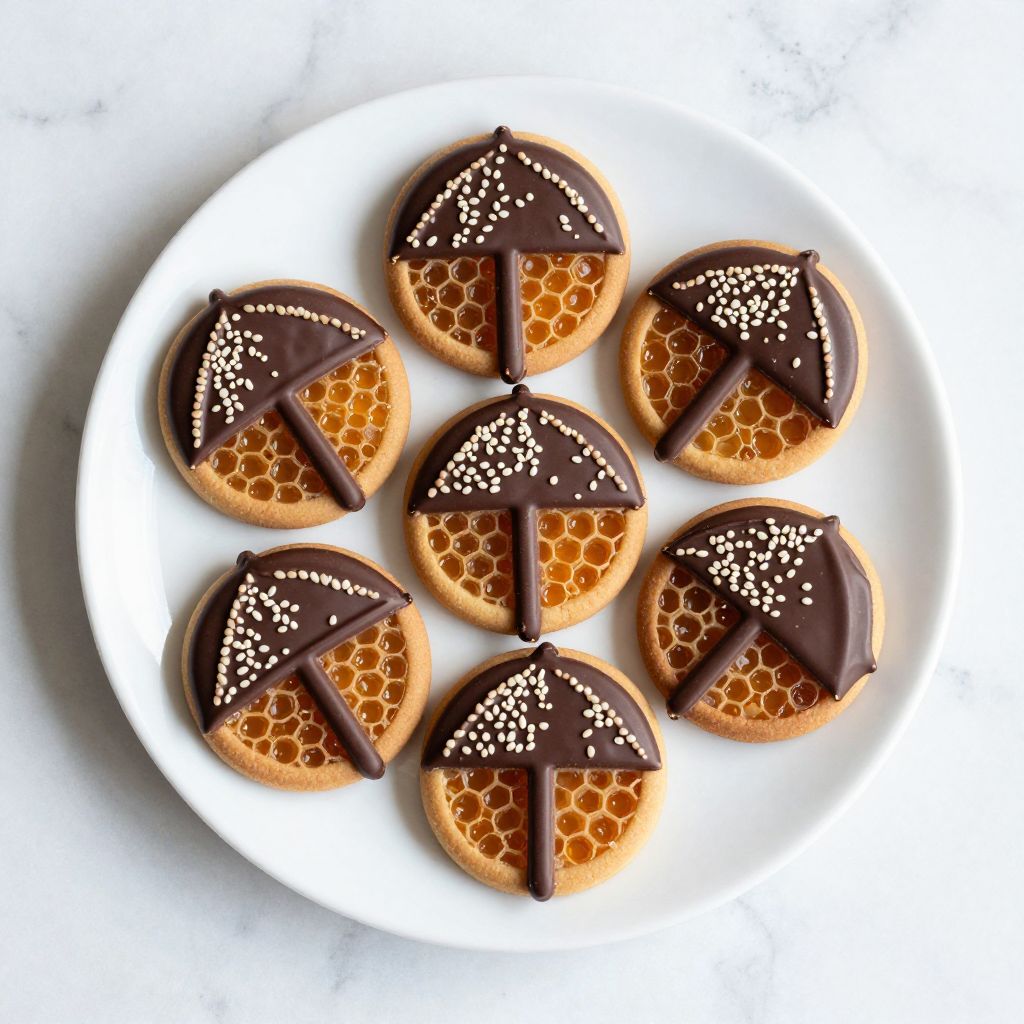
Squid Game cookies are those mesmerizing honeycomb-and-chocolate treats that took the world by storm after the Netflix series dropped.
If you’ve ever watched someone try to carve out a umbrella or triangle shape without breaking the cookie, you know why these are so fun to make at home. We’re talking crispy, buttery honeycomb candy dipped in rich chocolate and topped with a pop of sesame seeds.
The magic happens in your kitchen with just a handful of ingredients and a steady hand during the carving part. Let’s walk through exactly how to nail this recipe so your cookies look as good as they taste.
Why You’ll Love This Recipe
These cookies deliver serious visual impact paired with genuinely delicious flavor.
- Crispy, airy honeycomb texture that shatters on your tongue in the best way.
- Impressive enough to serve at parties or give as gifts without anyone knowing how simple they are.
- Fun carving step that feels like you’re solving a mini puzzle.
- Requires only five basic ingredients you probably have on hand.
- Ready to eat in under an hour from start to finish.
My Experience Making This Recipe
The first time I made these, I was nervous about the carving step. Would the honeycomb shatter before I got the shape right?
Turns out, the cookie is far more forgiving than I expected. The chocolate coating keeps everything together, and even if you mess up the shape slightly, it still looks intentional and delicious.
My friends lost their minds when I served them at a dinner party. Everyone wanted to know where I bought them, and their faces when I said I made them at home was absolutely worth the five minutes of work.
Recipe Overview
- Recipe Name: Squid Game Cookie Recipe
- Servings: 10 to 12 cookies
- Prep Time: 20 minutes
- Cook Time: 15 minutes
- Total Time: 35 minutes plus cooling
- Course: Dessert
- Cuisine: Korean-inspired
- Calories per Serving: 180
Equipment You Will Need
- Heavy-bottomed saucepan
- Candy thermometer
- Wooden spoon or silicone spatula
- Parchment paper
- Toothpick or thin skewer
- Small sharp knife or cookie cutter
- Shallow bowl for melted chocolate
- Baking sheet
- Small bowl for sesame seeds
Ingredients for Squid Game Cookies
For the Honeycomb Candy
- 1 cup granulated sugar
- 1/3 cup light corn syrup
- 1/4 cup water
- 1 tablespoon baking soda
- 1 teaspoon vanilla extract
- Pinch of sea salt
For Assembly
- 8 ounces dark or milk chocolate, chopped
- 2 tablespoons sesame seeds
Ingredient Notes and Substitutions
- Granulated sugar creates the candy base and caramelizes evenly when heated. Light brown sugar works if you want a deeper molasses note, though the texture will be slightly different.
- Light corn syrup prevents crystallization during cooking and keeps the honeycomb smooth. You can skip it, but the candy may turn grainy.
- Baking soda is crucial for the airy, porous honeycomb structure that makes these cookies so satisfying to bite. There’s no real substitute.
- Dark or milk chocolate is the coating. Use what you prefer; dark chocolate adds bitterness that balances the sweet candy nicely.
- Sesame seeds add visual appeal and a subtle nutty flavor. Black or white seeds both work beautifully.
How to Make Squid Game Cookies
Step 1: Combine Sugar, Corn Syrup, and Water
Pour the sugar, corn syrup, and water into your saucepan and stir until the sugar is completely wet. This mixture will heat more evenly when all the sugar is moistened before you turn on the heat.
Step 2: Heat the Mixture to Hard-Crack Stage
Place the saucepan over medium-high heat and insert your candy thermometer, making sure it does not touch the bottom. Stop stirring once the mixture begins to boil; stirring after this point can cause crystallization.
Watch the temperature climb to exactly 300 degrees Fahrenheit. This hard-crack stage is when the sugar has caramelized enough to develop the right color and crispness.
Step 3: Remove from Heat and Add Baking Soda
Once you hit 300 degrees, remove the pan from heat immediately and quickly stir in the baking soda and vanilla extract. The mixture will foam and bubble dramatically as carbon dioxide gas creates all those tiny air pockets.
Work fast but carefully here; the mixture is extremely hot and the bubbling happens quickly. Stir until the baking soda is fully combined, which takes about 10 seconds.
Step 4: Pour onto Parchment Paper
Pour the entire mixture onto a sheet of parchment paper in a thin, even layer. Do not spread it with a spoon; let gravity do the work and the residual heat will level it out naturally.
The mixture will cool and harden within minutes, so work fast if you need to adjust it slightly. Once it cools, you are committed to the shape, so make sure it is as flat and even as possible.
Step 5: Let the Honeycomb Cool Completely
Allow the honeycomb to cool at room temperature for at least 10 minutes until it is completely hard and no longer warm to the touch. This cooling step is essential because warm honeycomb will break apart when you try to carve it.
Step 6: Carve Your Shape
Using a small sharp knife or cookie cutter, carefully carve your chosen shape into the cooled honeycomb. You can go with the classic umbrella, triangle, or circle, or invent your own design.
The key is to use a gentle sawing motion rather than pressing down hard. Let the knife do the work, and the honeycomb will release cleanly without shattering into tiny pieces.
Step 7: Break into Individual Pieces
Carefully break or snap the honeycomb into separate cookies along the carved lines. If you carved cleanly, each piece will have one shaped side and one irregular side.
If a piece shatters or breaks unevenly, do not worry. You can still coat it in chocolate, and it will taste exactly the same.
Step 8: Melt the Chocolate
Chop your chocolate into small pieces and melt it gently using a double boiler or microwave in 20-second bursts, stirring between each burst. The chocolate should be smooth and pourable but not so hot that it feels hot to the touch.
If your chocolate is too thick, stir in a teaspoon of coconut oil or vegetable oil to thin it slightly. This helps the chocolate coat the honeycomb evenly without clumping.
Step 9: Dip Cookies in Chocolate
Working one cookie at a time, dip the shaped side of each honeycomb piece into the melted chocolate, coating it generously. You can dip it partway or fully, depending on how much chocolate coverage you prefer.
Hold it over the bowl for a moment to let excess chocolate drip off, then place it on parchment paper with the chocolate side up. The drips add visual appeal.
Step 10: Add Sesame Seeds and Set
Sprinkle sesame seeds onto the wet chocolate while it is still soft. Let the chocolate set at room temperature for about 15 minutes, or place the cookies in the refrigerator for 5 minutes to speed things up.
Once the chocolate hardens, your cookies are ready to eat. The contrast of crispy honeycomb, creamy chocolate, and crunchy sesame seeds makes each bite satisfying.
Pro Tip: Carve your shapes with confidence and a sharp knife. A dull blade will crush the honeycomb instead of slicing cleanly through it.
Tips for the Best Squid Game Cookies
- Use a candy thermometer and trust it completely. Off by even 5 degrees and your honeycomb texture will be either too soft or too hard.
- Pour the hot candy mixture onto parchment paper, never directly onto a baking sheet, as it will stick and be nearly impossible to remove.
- Carve your shapes while the honeycomb is completely cool but before you dip it in chocolate. Once coated, the chocolate shell makes carving much harder.
- Keep your knife warm by dipping it in hot water and wiping it dry between cuts. This helps you carve through the honeycomb cleanly.
- Store finished cookies in an airtight container at room temperature. They stay crispy for up to three days.
- Make the honeycomb on a dry day if possible. High humidity can make the candy sticky and soften it faster.
Common Mistakes to Avoid
- Stirring after the mixture starts boiling causes sugar crystallization, turning your smooth candy grainy. Trust the process and keep your spoon still.
- Not reaching 300 degrees creates undercooked candy that stays too soft to carve. Use a reliable thermometer and wait for the exact temperature.
- Over-mixing the baking soda loses the airy texture. Stir just until combined, which takes 10 seconds or less.
- Trying to carve warm honeycomb results in crumbling and frustration. Always wait for complete cooling first.
- Chocolate that is too hot burns and becomes thick and uncooperative. Cool it slightly before dipping your cookies.
Serving Suggestions
Squid Game cookies are stunning on their own, but a few pairings make them shine even brighter.
- Serve alongside hot tea or coffee for an afternoon treat that feels fancy but is totally homemade.
- Package them in a clear cellophane bag tied with ribbon as a gift. People love the visual impact.
- Pair with vanilla ice cream for a fun dessert where the cold ice cream melts into the warm honeycomb.
- Arrange on a dessert board with other bite-sized sweets for an impressive spread at parties.
- Crumble leftover cookies and mix into vanilla yogurt or use as ice cream topping.
Variations to Try
- White chocolate coating instead of dark chocolate creates a sweeter, milder flavor profile. The sesame seeds pop visually against the white base.
- Sprinkle crushed pistachios or chopped peanuts on top of the wet chocolate instead of sesame seeds for added crunch and flavor.
- Dust the finished cookies with edible gold leaf or shimmer dust for a more luxurious presentation. This looks stunning at weddings or formal events.
- Create a two-tone effect by dipping half the cookie in dark chocolate and half in white or milk chocolate. Let each side set before flipping and dipping the other side.
- Make smaller, bite-sized honeycomb pieces instead of large cookies. These are perfect for party platters and easier to eat.
Dietary Adaptations
- Gluten-free: This recipe is naturally gluten-free as written, but verify your chocolate and baking soda are certified gluten-free if needed.
- Dairy-free: Use dairy-free chocolate for coating. The trade-off is that dairy-free chocolate may not harden quite as quickly or snappily as real chocolate.
- Vegan: Use dairy-free chocolate and verify your baking soda is vegan. Everything else in the recipe is already plant-based.
- Low-carb or keto: Substitute the sugar with a one-to-one sugar substitute like erythritol. The texture may be slightly different, and you will need to test your thermometer readings carefully since sugar substitutes behave differently.
Storage and Reheating
Refrigerator
Store finished cookies in an airtight container at room temperature for up to three days. The honeycomb stays crispy as long as no moisture gets inside.
- Keep container away from heat and humidity.
- Do not refrigerate, as cold temperatures can make the honeycomb absorb moisture and soften.
Freezer
You can freeze unbaked honeycomb candy in an airtight container for up to two weeks. Freeze the cooled, uncarved sheet whole to prevent breakage.
- Thaw at room temperature for 30 minutes before carving and chocolate coating.
- Finished cookies do not freeze well because the chocolate and sesame coating can separate and the texture changes.
Reheating
These cookies are meant to be eaten at room temperature and do not need reheating. If your chocolate coating has softened, place cookies in the fridge for 5 minutes to firm back up.
- Never microwave these cookies as the honeycomb will become rubbery.
- Let them come back to room temperature before eating for the best texture contrast.
Nutrition Information
| Nutrient | Amount |
|---|---|
| Calories | 180 |
| Total Fat | 6g |
| Saturated Fat | 3g |
| Carbohydrates | 32g |
| Fiber | 1g |
| Sugar | 28g |
| Protein | 2g |
| Sodium | 85mg |
| Cholesterol | 2mg |
These values are estimates based on a standard recipe serving 11 cookies. Actual nutrition may vary based on specific brands and portion sizes you choose.
Frequently Asked Questions
Can I make these cookies ahead of time?
Yes, you can make the honeycomb base up to a week ahead and store it uncarved and uncoated in an airtight container. Carve and coat them the day you plan to serve them for the best texture.
What if my honeycomb candy crystallized and turned grainy?
Crystallization happens when you stir after the mixture boils. Start over with fresh ingredients, and this time resist the urge to stir once boiling begins.
Can I use a silicone mold instead of hand-carving?
Yes, pour the hot honeycomb mixture into silicone molds instead of onto parchment paper. Let it cool and harden, then pop the shapes out.
Why is my chocolate coating cracking as it dries?
Cracking usually means the chocolate was too hot when you dipped. Cool your melted chocolate to about 85 degrees Fahrenheit before dipping.
Can I use honey instead of corn syrup?
Honey will change the flavor noticeably and may alter the cooking time slightly, but it can work. Use the same amount and follow the recipe as written, watching your temperature carefully.
Is baking soda really necessary?
Yes, baking soda is what creates the honeycomb texture. Without it, you will have hard candy instead of the airy, porous texture that makes these cookies special.
Final Thoughts
Making Squid Game cookies at home is simpler than you might think and way more rewarding than ordering them. The carving step feels like you are creating edible art, and the result tastes as good as it looks.
Grab a candy thermometer, a sharp knife, and some chocolate, then give this recipe a shot. Your friends and family will be asking for the recipe before they even finish eating their first cookie.
Squid Game Cookies
Ingredients
Equipment
Method
- Combine the granulated sugar, light corn syrup, and water in a heavy-bottomed saucepan and stir until all sugar is moistened.
- Place the pan over medium-high heat, insert a candy thermometer without touching the bottom, and bring to a boil without stirring until the mixture reaches 300°F (hard-crack stage), about 10–12 minutes.
- Immediately remove the saucepan from heat and quickly stir in the baking soda, vanilla extract, and sea salt for about 10 seconds; the mixture will foam vigorously.
- Pour the foaming candy onto a parchment-lined baking sheet and allow it to spread naturally into a thin layer without touching it.
- Cool the honeycomb completely at room temperature for roughly 10 minutes, until hard and no longer warm.
- Using a small sharp knife or cookie cutter, gently carve desired shapes (umbrella, triangle, circle, etc.) into the cooled honeycomb.
- Snap the candy along the carved lines to create individual cookies, working slowly to avoid shattering.
- Melt the chopped chocolate in a shallow bowl over a double boiler or in the microwave in 20-second bursts, stirring until smooth and 85°F.
- Dip the shaped side of each honeycomb piece into the melted chocolate, letting excess drip off, and return to parchment paper chocolate-side up.
- Sprinkle sesame seeds onto the wet chocolate and let the cookies set at room temperature for 15 minutes (or chill 5 minutes in the refrigerator) until the chocolate is firm.